Winter Alpine Layering
For many people the clothing you bring with you into the mountains can be the hardest part of planning your trip. There can be so many unknowns when trying to prepare, and bringing the wrong garment can mean the difference between staying dry and comfortable in inclement weather. This task only gets harder when preparing for the winter environment. The main difference being you cannot recover from your mistakes as easily as in a summer. If you bring a rain coat that is to light weight during the summer you may get soaked during a quick rain shower, but you may be able to dry off when the sun comes back out. During the winter, the storms are colder, last longer, and are overall more intense. Therefore, having a rain shell that is too light weight could cause you to become drenched from wet heavy snow with no environmental factors to help you dry out. You’ll be shivering in your sleeping bag with a warm Nalgene to try to regain some body heat. Overall, having the right equipment will make being in the harshest environments comfortable.
Materials: These days outdoor clothing is made from two primary fabrics: wool, synthetic, or a blend of the two. Each material has its own pros and cons, and it is worth experimenting on day trips to find which material works better for you. Some people prefer the feeling of wool over synthetic, and another big plus is that wool fights body odor more than synthetic. So, if you want to be a good tent- mate, maybe consider wool. If you do choose wool, it is worth buy the higher quality merino wool garments, merino wool is specifically made for outdoor wear and it doesn’t itch like the cheaper stuff. Companies like Outdoor Research, Mammut, and Smartwool make good products.
Types of Insulation: Same as materials for the base layers, there are two main types of insulation: Synthetic and down. The pros of down insulation are that it is lighter weight, better packable, and generally is warmer. The main con of down is that when it gets wet it loses warmth. The pros of synthetic are it can last longer and when it gets wet it can still maintain some warmth. The cons are that it is generally heavier and bulkier to pack. When I pack multiple insulation layers, I’m often choosing at least one down jacket and one synthetic, for more versatility and different applications. My biggest jacket I have in the winter is going to be down, because it’ll pack down smaller. If I’m going out into a rainy or more humid environment, I will often choose synthetic.
Head: The head is probably the most important appendage on the human body, and as such has many delicate sensory organs built in that must be taken care of!
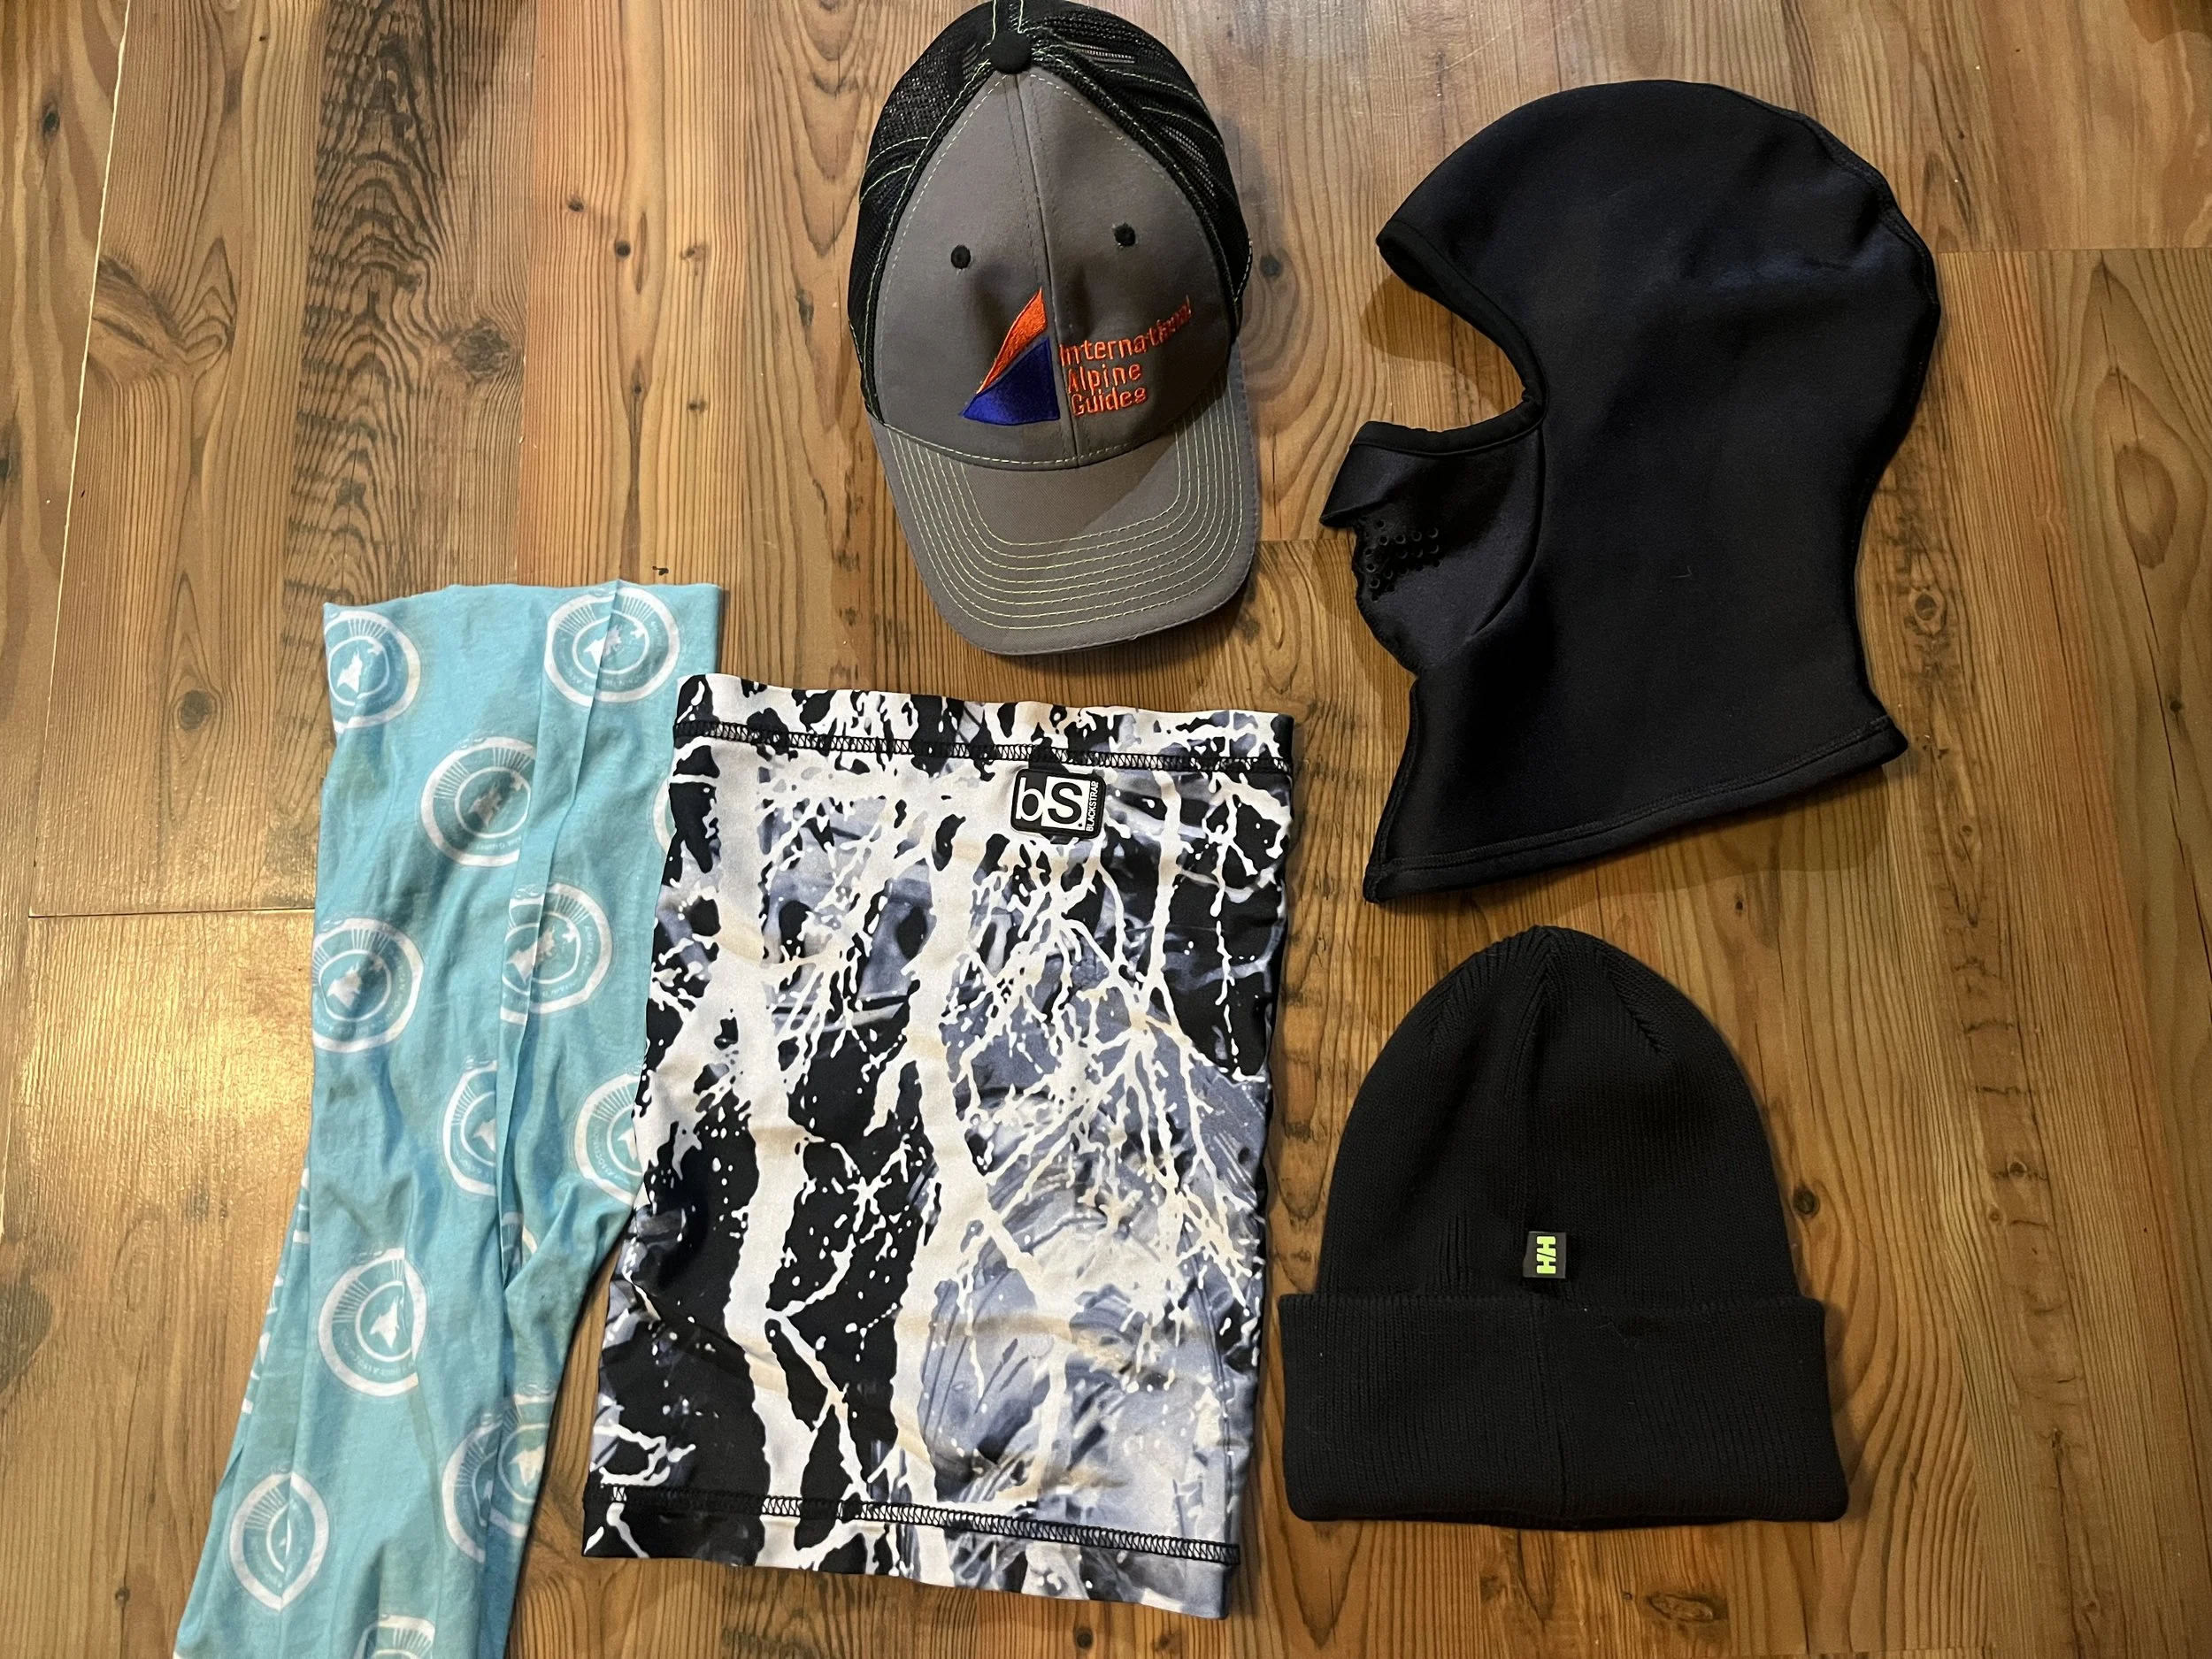
Baseball Hat: The best use for a brimmed hat of sorts is for keeping the sun out of your eyes when it does come out, and keeping your jacket hoods from falling down to obscure your vision. For many first-time travelers in a snowy winter environment, it can be surprising how intense the sunlight is, the snow reflects the sun’s rays up from the ground and clouds can reflect the sun’s light down from the sky. This causes a huge amount of strain on the unprotected eye and can cause snow blindness. A good brimmed hat paired with high quality sunglasses will keep the cataracts at bay.
Insulation Hat: I’m sure everyone reading this article has heard some sort of saying that 30, or 60 percent of body heat is lost through one’s head. While most estimated percentages are dramatically overstated, it is surprising how much warmer you feel when you do put on an insulating hat. Having a good wool beanie could add quite a bit of comfort in the backcountry especially to keep your ears warm! Pro tip: get a hat that doesn’t have a little ball on top and fits under your climbing helmet without getting in your eyes!
Buff: Many companies make buffs or neck gators, most of which are from thinner material. Having a thin buff is great for when you are moving and building body heat, but some companies also make a heavier “winter weight” buff that easily protects your face when you pull onto that alpine ridgeline and get caught in 40 mph crosswinds.
Balaclava: A useful piece of clothing for extreme conditions, I usually use this when there is too much wind for the buff and the hoods on my jackets to do any good.
A selection of headwear- baseball hat, balaclava, warm hat without a ball on the top, a thin buff on the left, and a thicker more insulated buff in the middle.
Upper Body: The upper body is home to all the vital organs; therefore, you need to keep this section of you person warm above all else, the minute the upper body’s core temperature drops the rest of the body has to pay the price. Blood flow is restricted to your appendages and leads to cold hands and feet, before you know it your body temp is spiraling lower and lower. On the other side of the coin over layering your upper body will cause early fatigue, sweating, and even possible heat stoke! Having a clear and versatile system is a great way to keep from being uncomfortable.
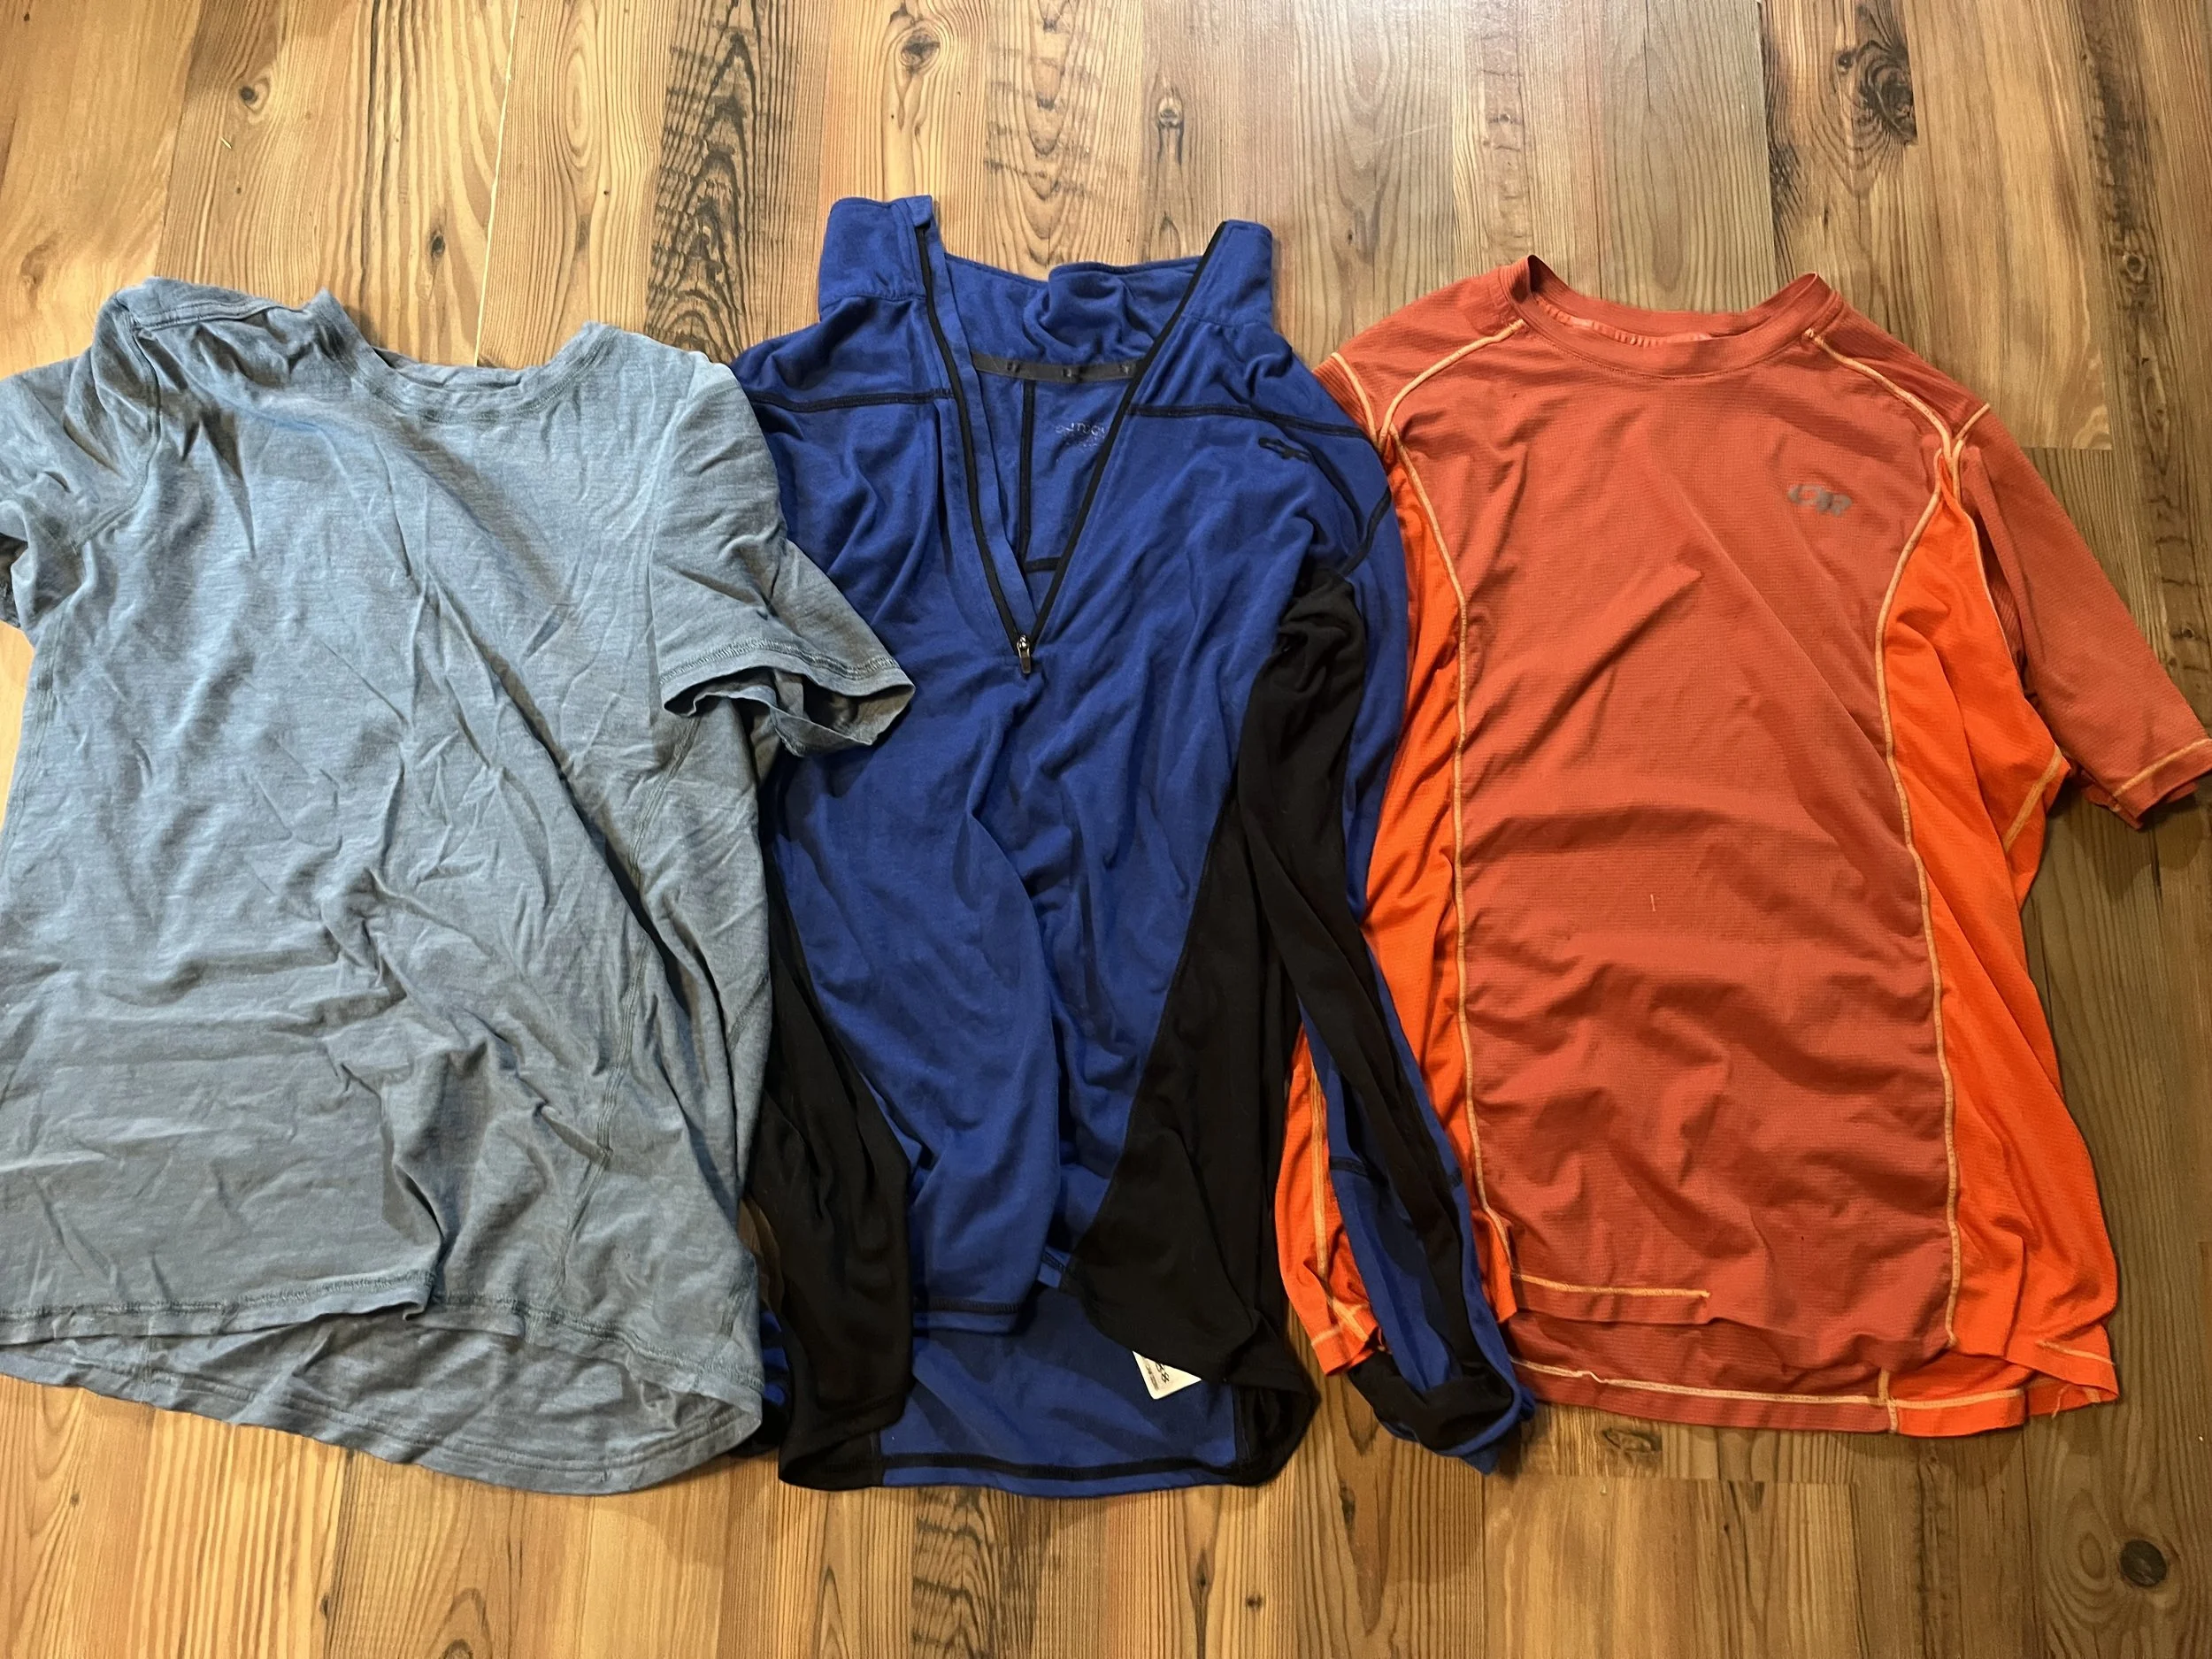
Base Layers: Base layers are a commonly overlooked piece of equipment. It might be enticing to save a few bucks and bring out a T- shirt, and I myself am guilty of making this mistake! Your base layer is essentially an extra layer of skin you wear over your actual skin. It goes with you from the car to camp to bed, then to the next day with you. In a winter environment that base layer is as much of a part of you as your own nose. The base layer’s main job is to capture moister (mostly from perspiration) and move it from the skin side of the shirt to the outside. Eventually if you sweat enough the layer will become soaked out, but then you dry it out in your sleeping bag over the night and it’s ready for the next day! All that is to say, spend some money and buy at least one good base layer. One winter trips I prefer having two, maybe a T- shirt style and a long sleave. I can wear them both over each other for more insulation, and if one gets soaked out after a strenuous section, I can just switch to the other one.
A selection of base layers- on the left is a synthetic T- shirt, middle is a wool long sleeve, and the right is a blend.
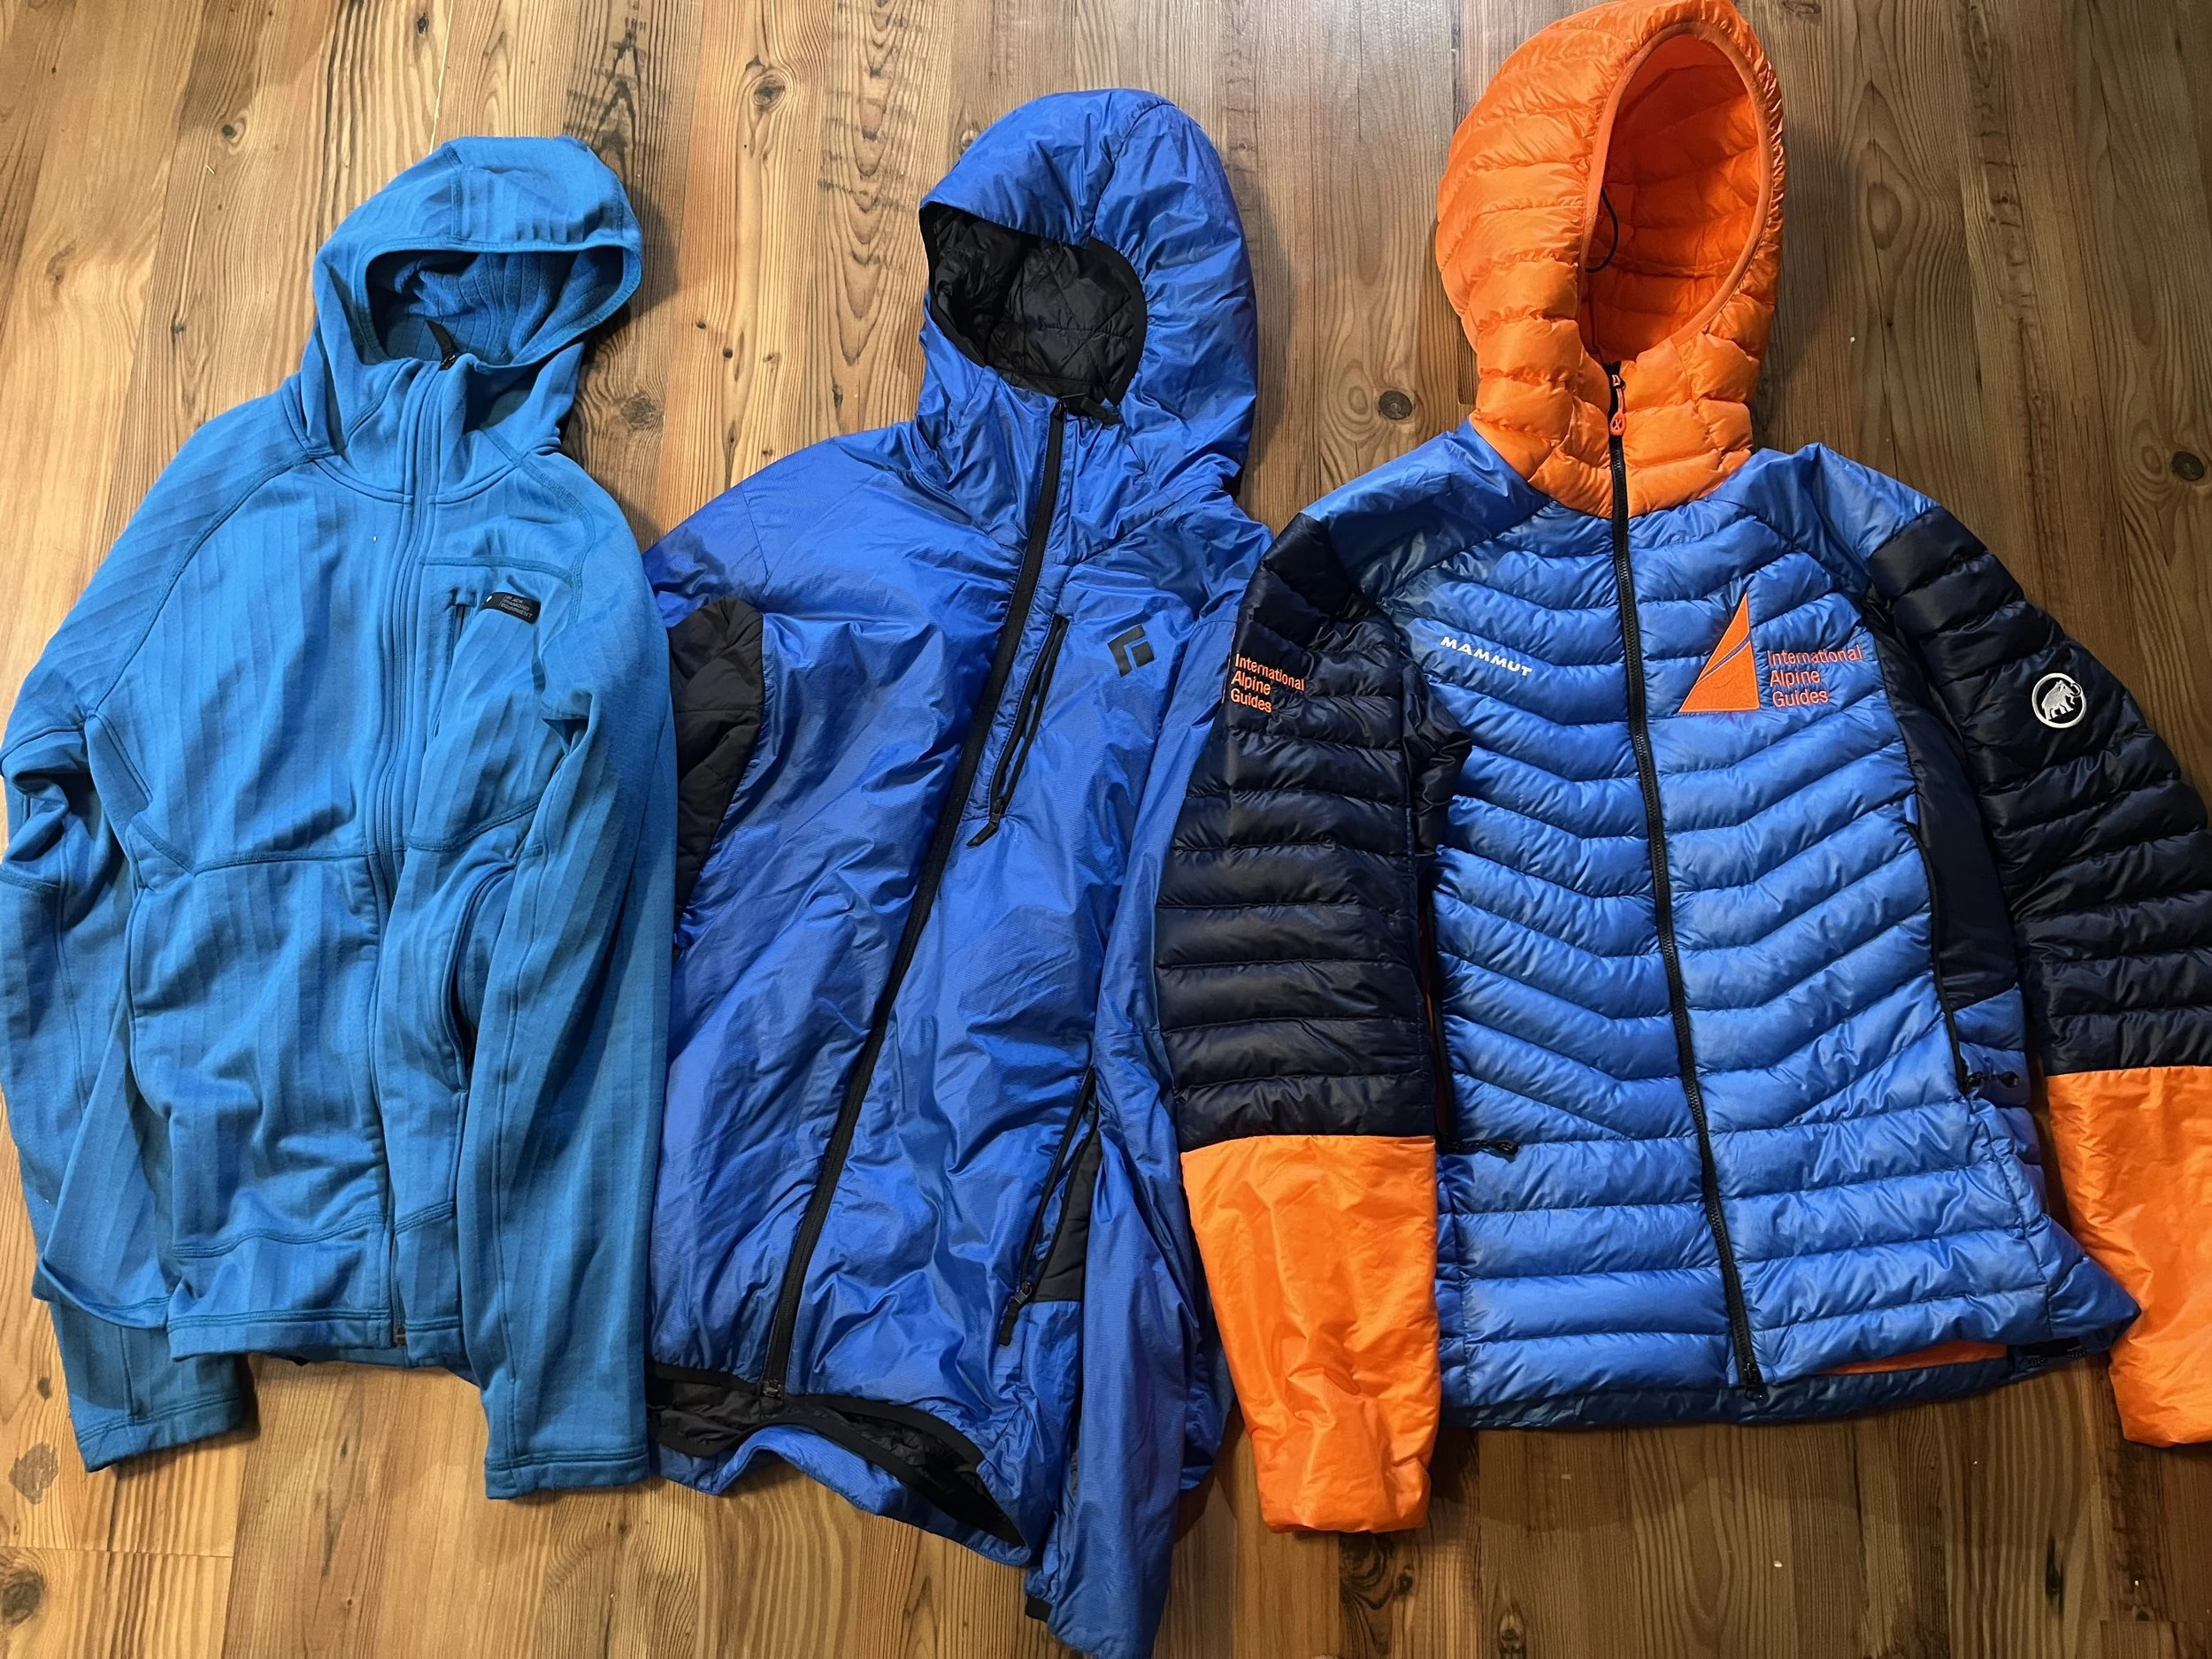
Mid Layers: Mid layers are layers that are worn in-between your base layer and outer layer. I generally divide these layers into two separate categories: fleece layer and midweight insulation layer
Fleece: On pretty much every trip I go on I bring a fleece layer, just about every clothing company makes some form of a fleece jacket. Fleece is a durable material and is a great addition your base layer for moving insulation. I’ll often be hiking uphill with just my Fleece on in cool but calm weather. When the wind pics up or it starts to rain or snow, I put my raincoat on and the combination helps to keep me warm but not over heat while walking uphill.
Midweight insulation: The fleece acts as the first layer of insulation in my system, the midweight layer is the second layer. It can be down or synthetic (though generally I use synthetic) and fits over my fleece layer and under my waterproof layers. I usually pull this layer out when I’m stop and go, like belaying my clients up a windy alpine ridge. I need a little more insulation to stay warm and I’m not moving enough to build up heat.
Example of mid layers: left is a fleece layer, middle is synthetic insulation, right is down insulation. Left to right: Black Diamond Coefficient Hoody, Black Diamond Vision Hybrid hoodie, Mammut Eigerjoch Hoody.
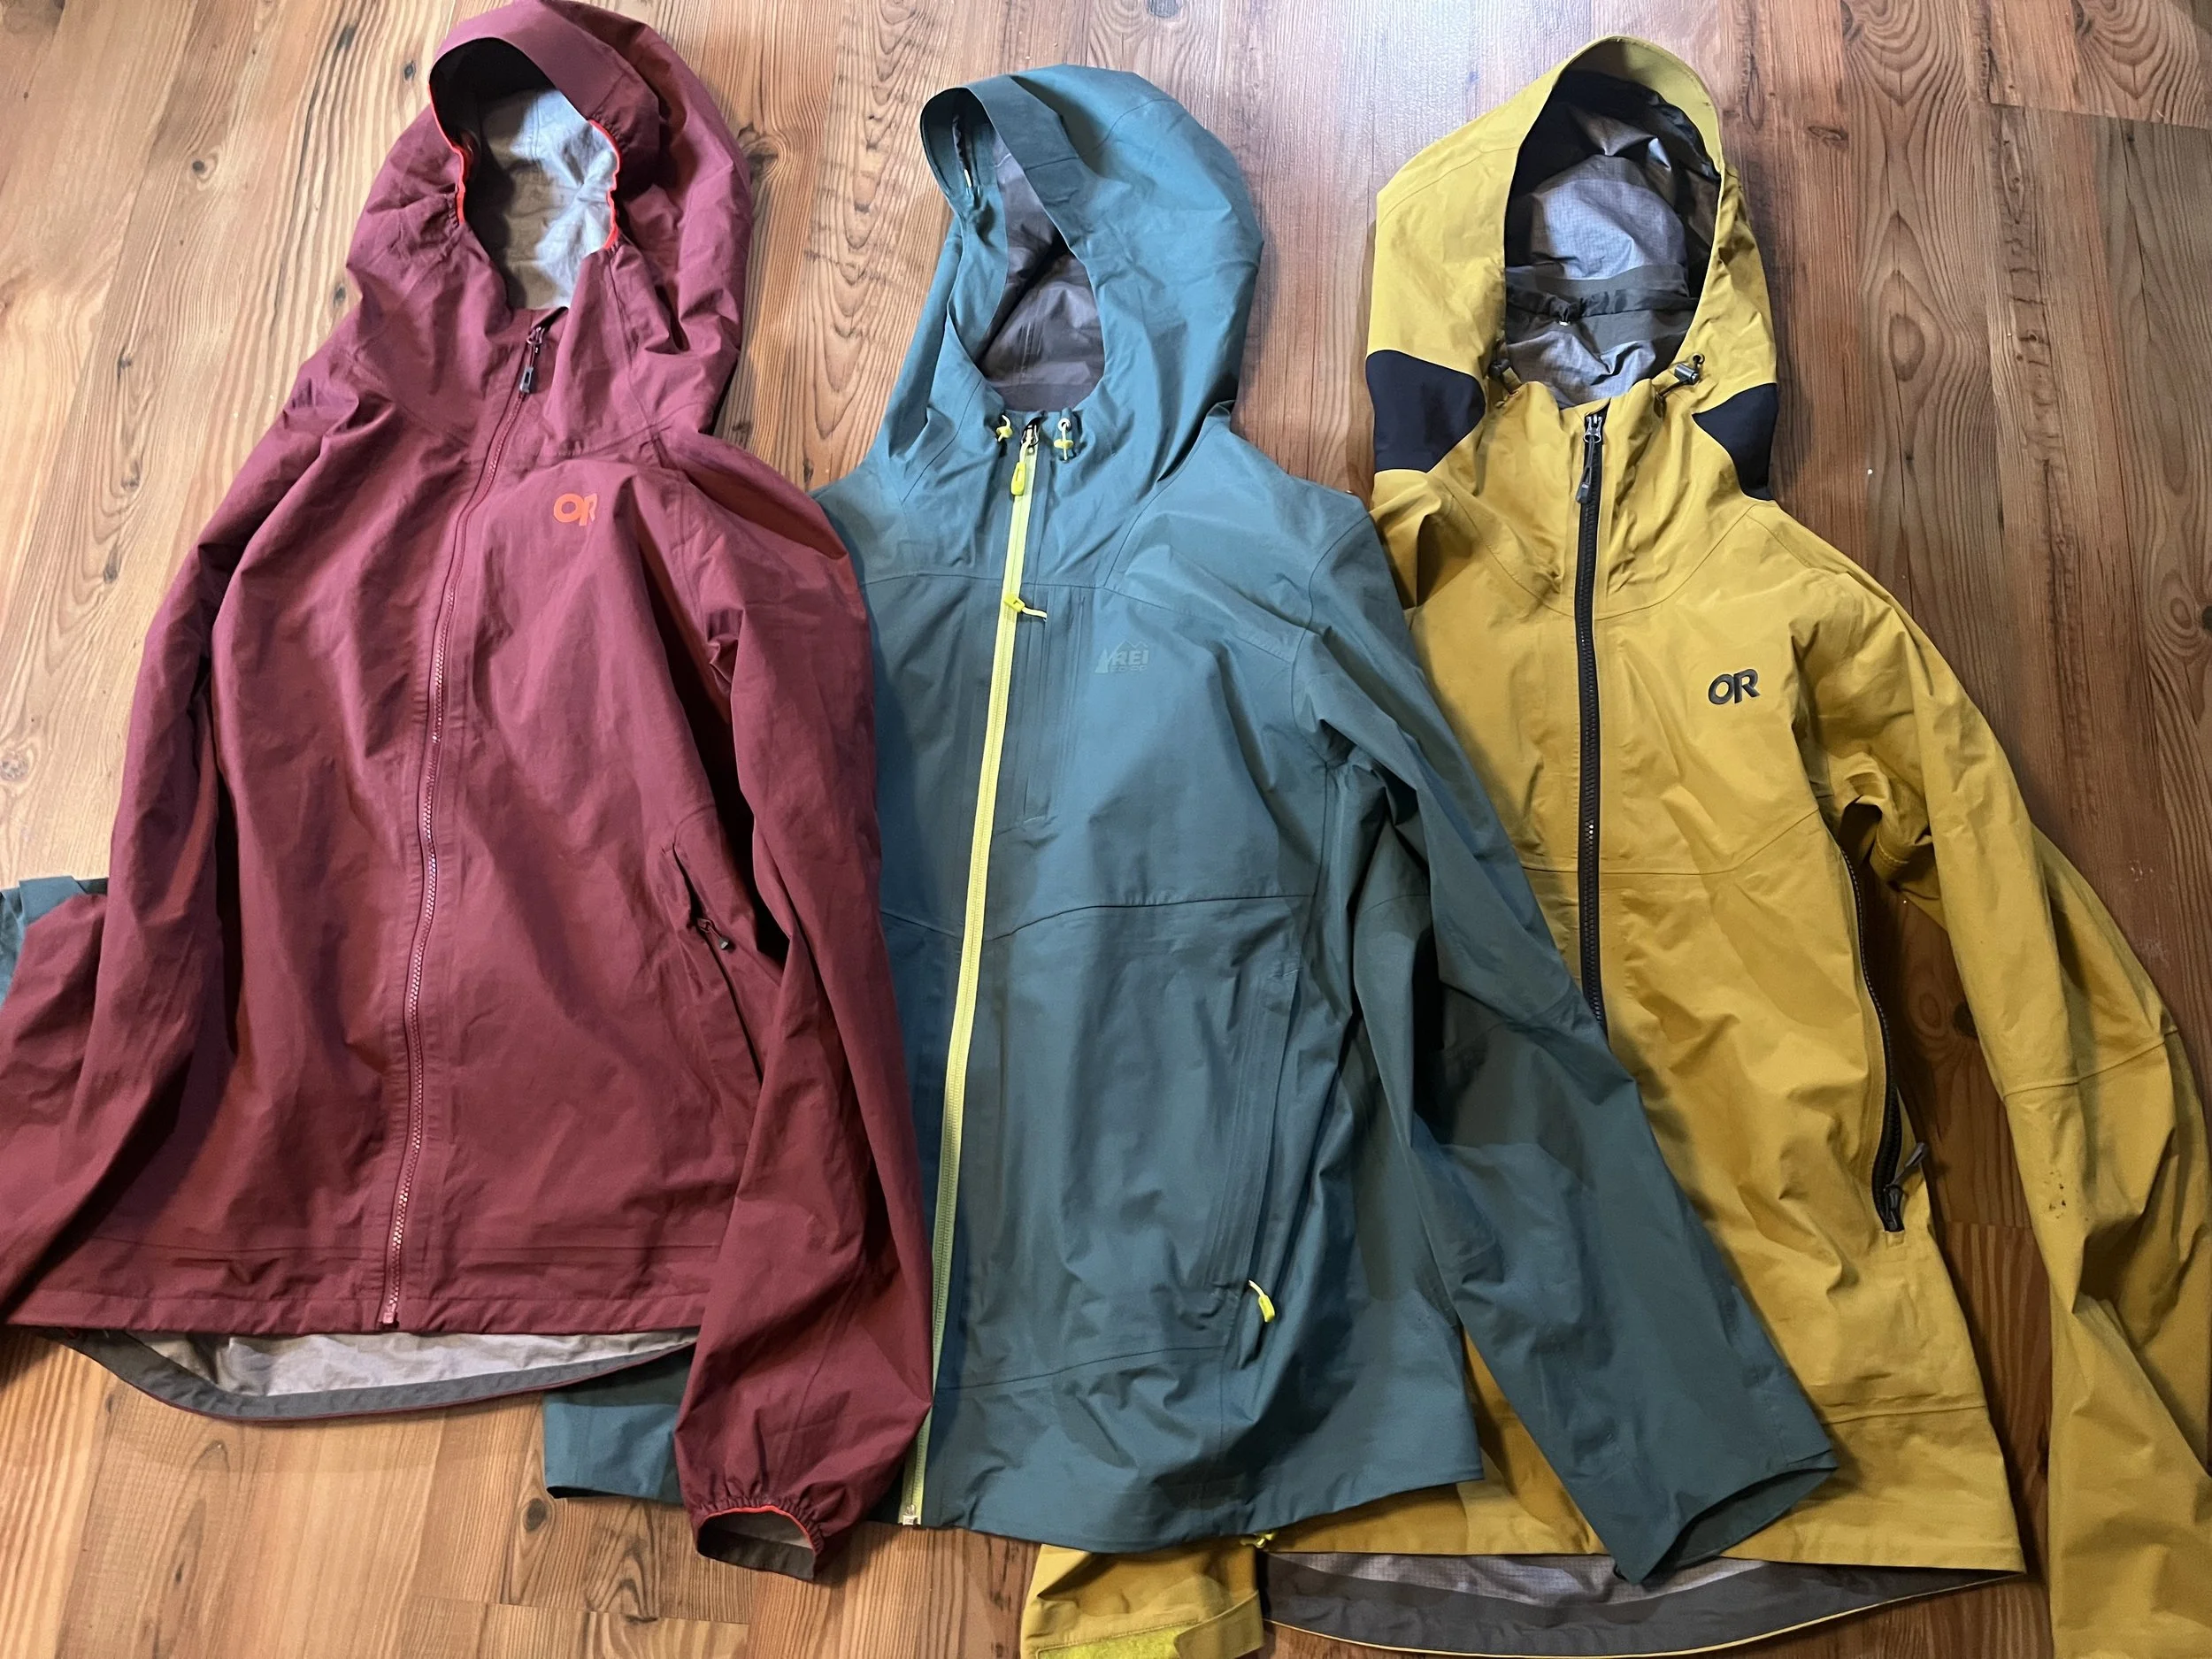
Waterproof Layers: Often called “alpine insurance,” the rain layers are pretty much always in my pack, even when there is no rain in the forecast. You get a lot of wind in the alpine, so having a hard-shell with you really helps to maintain body heat. Often on chilly alpine mornings I’ll layer my hard shell over my fleece for the approach, then at the base of the climb I’ll add in my mid layer. In the winter environment go with a robust rain coat, made from thicker fabric and with a Gortex layer. It won’t pack down nearly as small but it will be a complete fortress from the elements. Having “pit zips” helps to vent some extra heat if needed, water proof pockets, and full hood adjustments are a must! Pro tip: be sure that your climbing helmet fits under the hood for keeping rain, snow, and wind out!
Examples of rain coats: left is a lightweight rain coat- useful for day trips in good weather, middle is mid weight rain coat, and right is the heavy rain coat- this is usually what I bring out for winter mountaineering. Left to right: OR Ascendant hoody, REI Zero dry jacket, OR Foray II jacket.
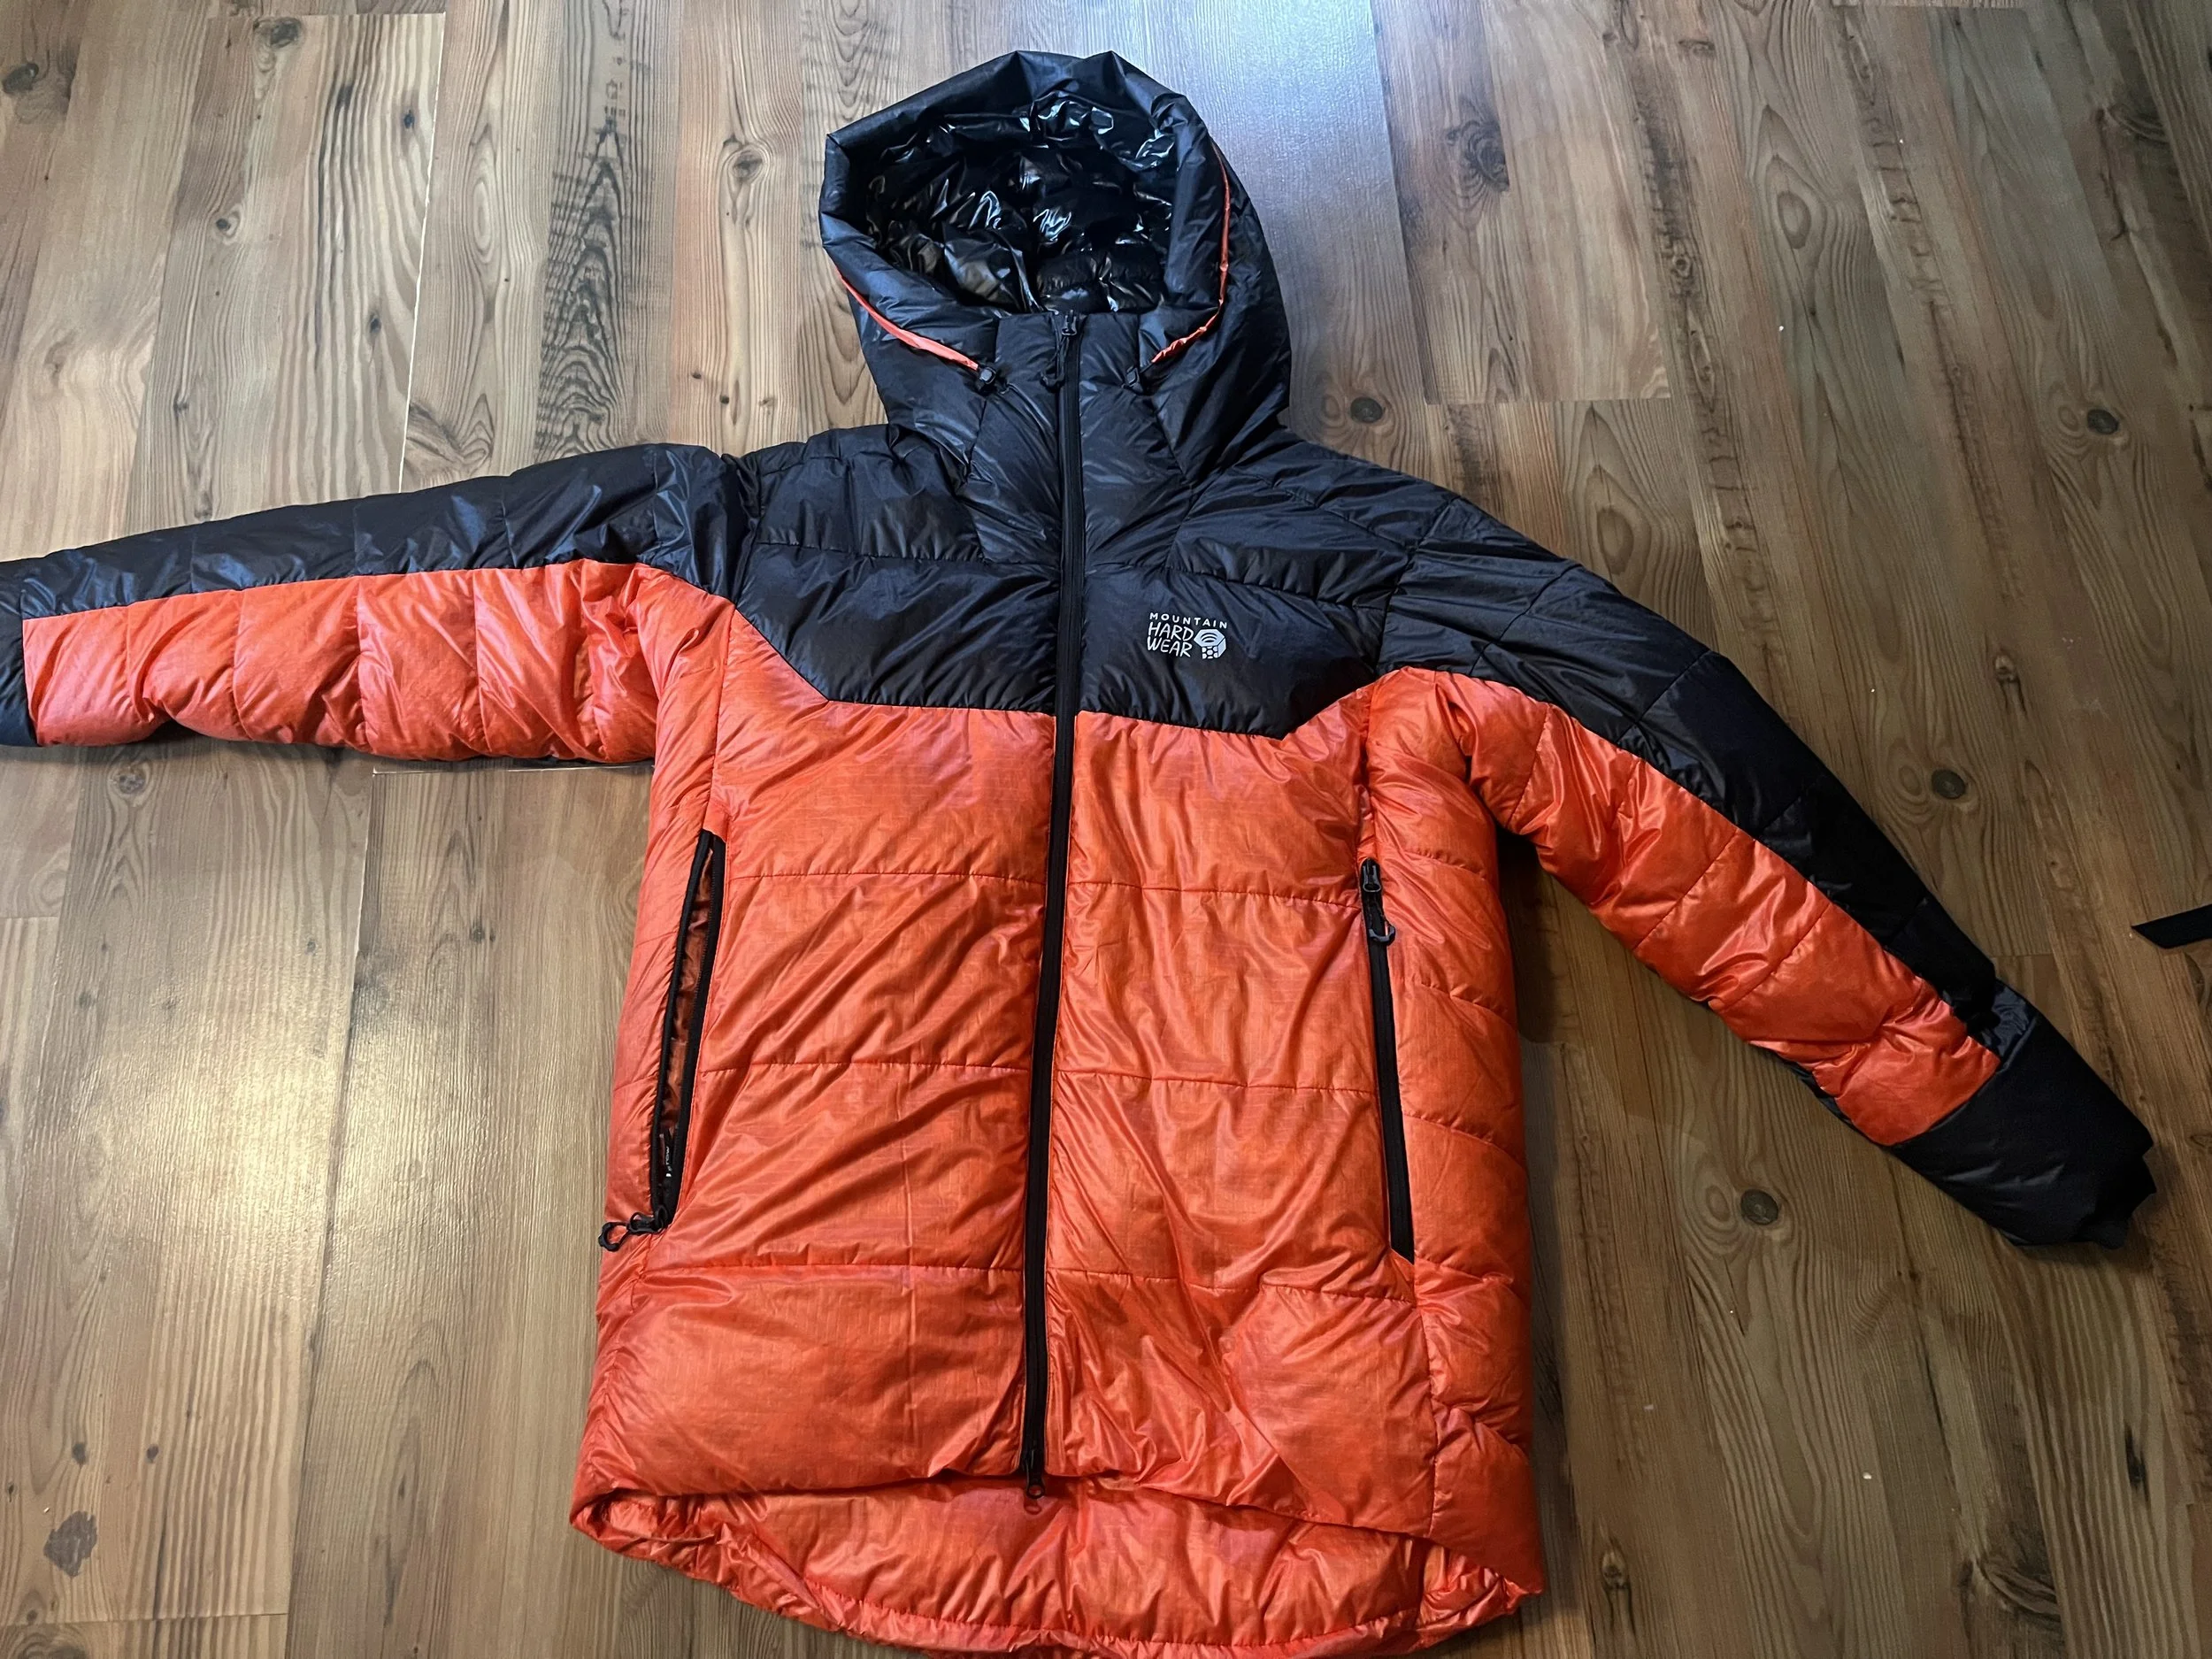
Heavy Insulation Layers: Insulation layers are essentially the same as mid weight insulation layers, only bigger! Also called a parka, it should be a large jacket made from down that can fit over all your other layers. This is the jacket you pull out when you get to camp and stop moving, it’s basically a sleeping bag. Try on a few different jackets at the store and bring all your other layers with you to ensure that they all fit together. Most of these jackets also come with a water-resistant outer to help keep moisture out but it is not a substitute for your rain coat!
Big puffy jacket, this is the Mountain Headwear Phantom Belay Down.
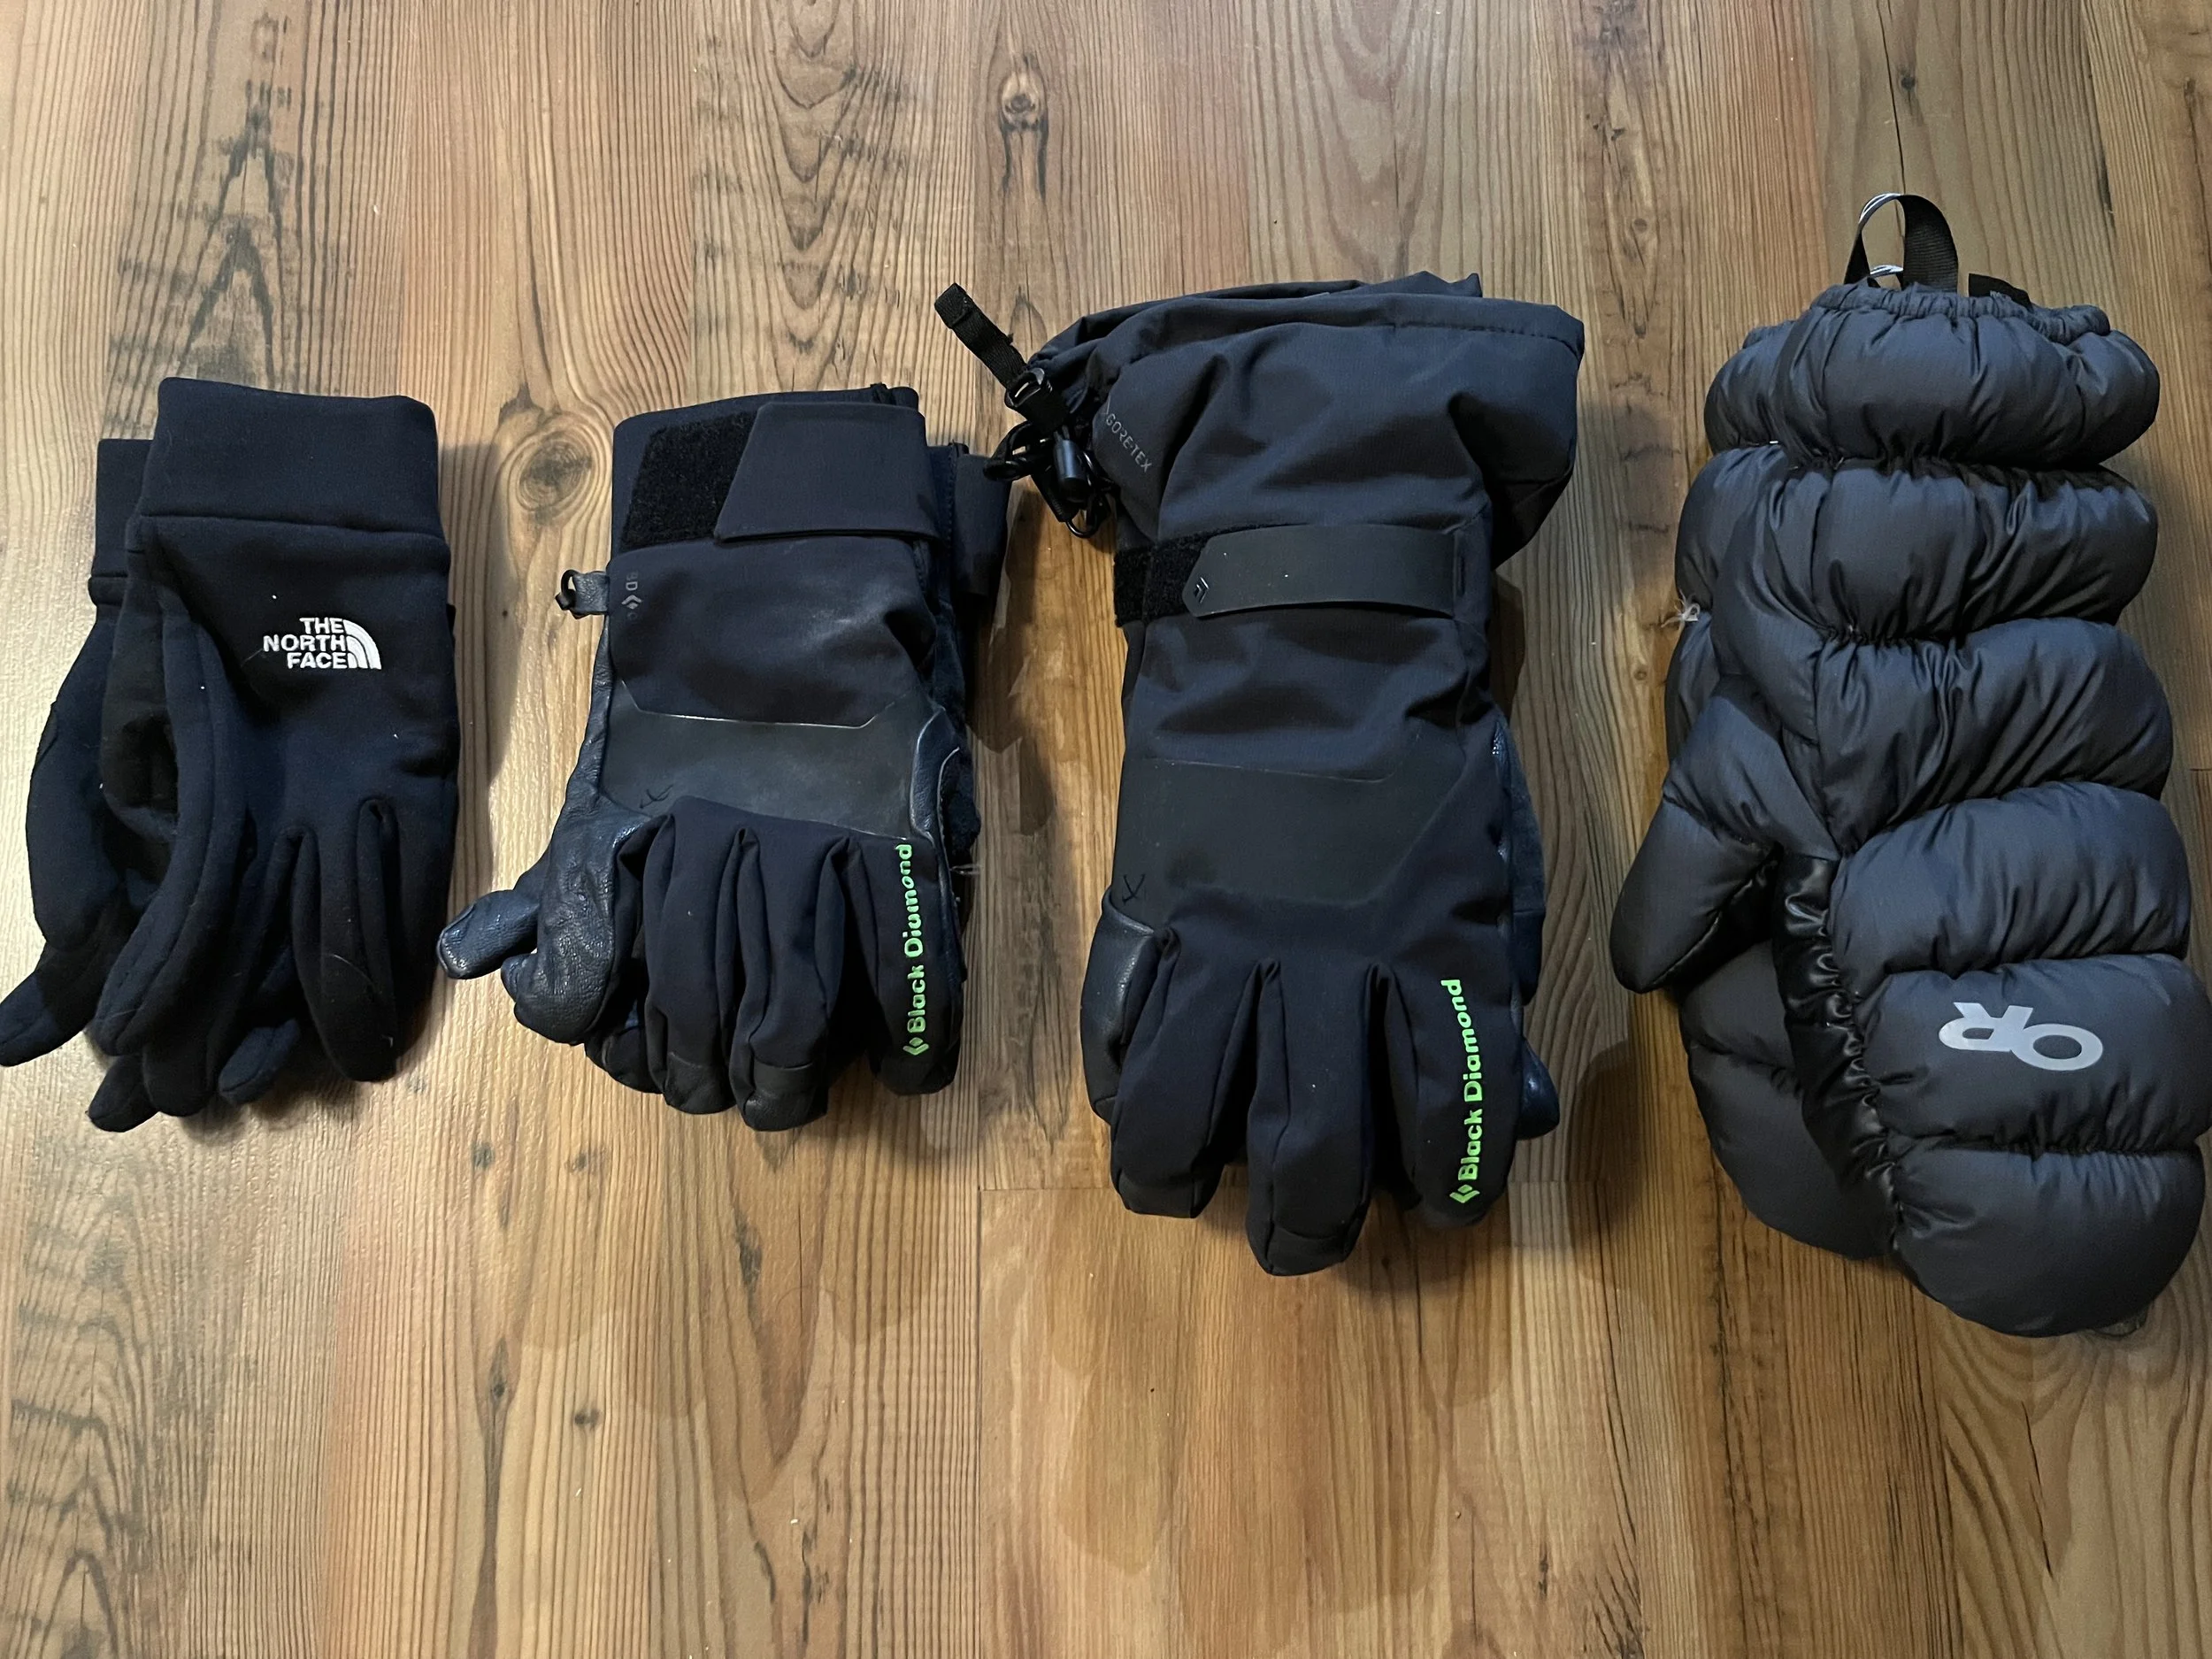
Gloves: When going into the high mountain winter environment you will be using your hands a lot, gloves are often good at one or two things but not good at everything. In other words, you will not be able to use your favorite pair of gloves for every task in the mountains. In the winter I often bring three or even four pairs of gloves with me so I can maintain the combo of hand protection and dexterity I need for the task at hand.
Thin Gloves: These mainly act as “moving gloves,” the gloves I wear when I’m approaching uphill or to the camp. You’ll be working hard but still will want some form of protection for your hands. I often use cheaper fleece gloves.
Mid Gloves: These are the “every day, every way gloves,” as in the gloves that are on my hands 80 percent of the time. They have more insulation than the thin gloves but are still thin enough that I can do things like tie myself into the rope or work with climbing gear.
Heavy Gloves: For when the going gets cold! I usually save these gloves for around the top of the climb, when the wind is the heaviest and the conditions can be the hardest. I usually will still go for full fingered gloves over mittens so I can use my fingers, but at this point I am losing dexterity.
Mittens: Worth bringing out in the winter, a guaranteed way to rewarm your hands after getting cold or wet. I often leave them in the bottom of my pack as an emergency piece.
Left to right: thin gloves (North Face fleece), mid weight gloves (Black Diamond terminator), thicker gloves (Black Diamond Enforcer), and mittens (Outdoor Research Coldfront down mits)
Lower Body: In general, the lower body tends to be a little bit tougher than the upper body, most of the time when I still have multiple layers on my upper body in warm weather, I’ll only have one pair of pants for my lower body. However, in the winter environment your legs will need a little bit more warmth.
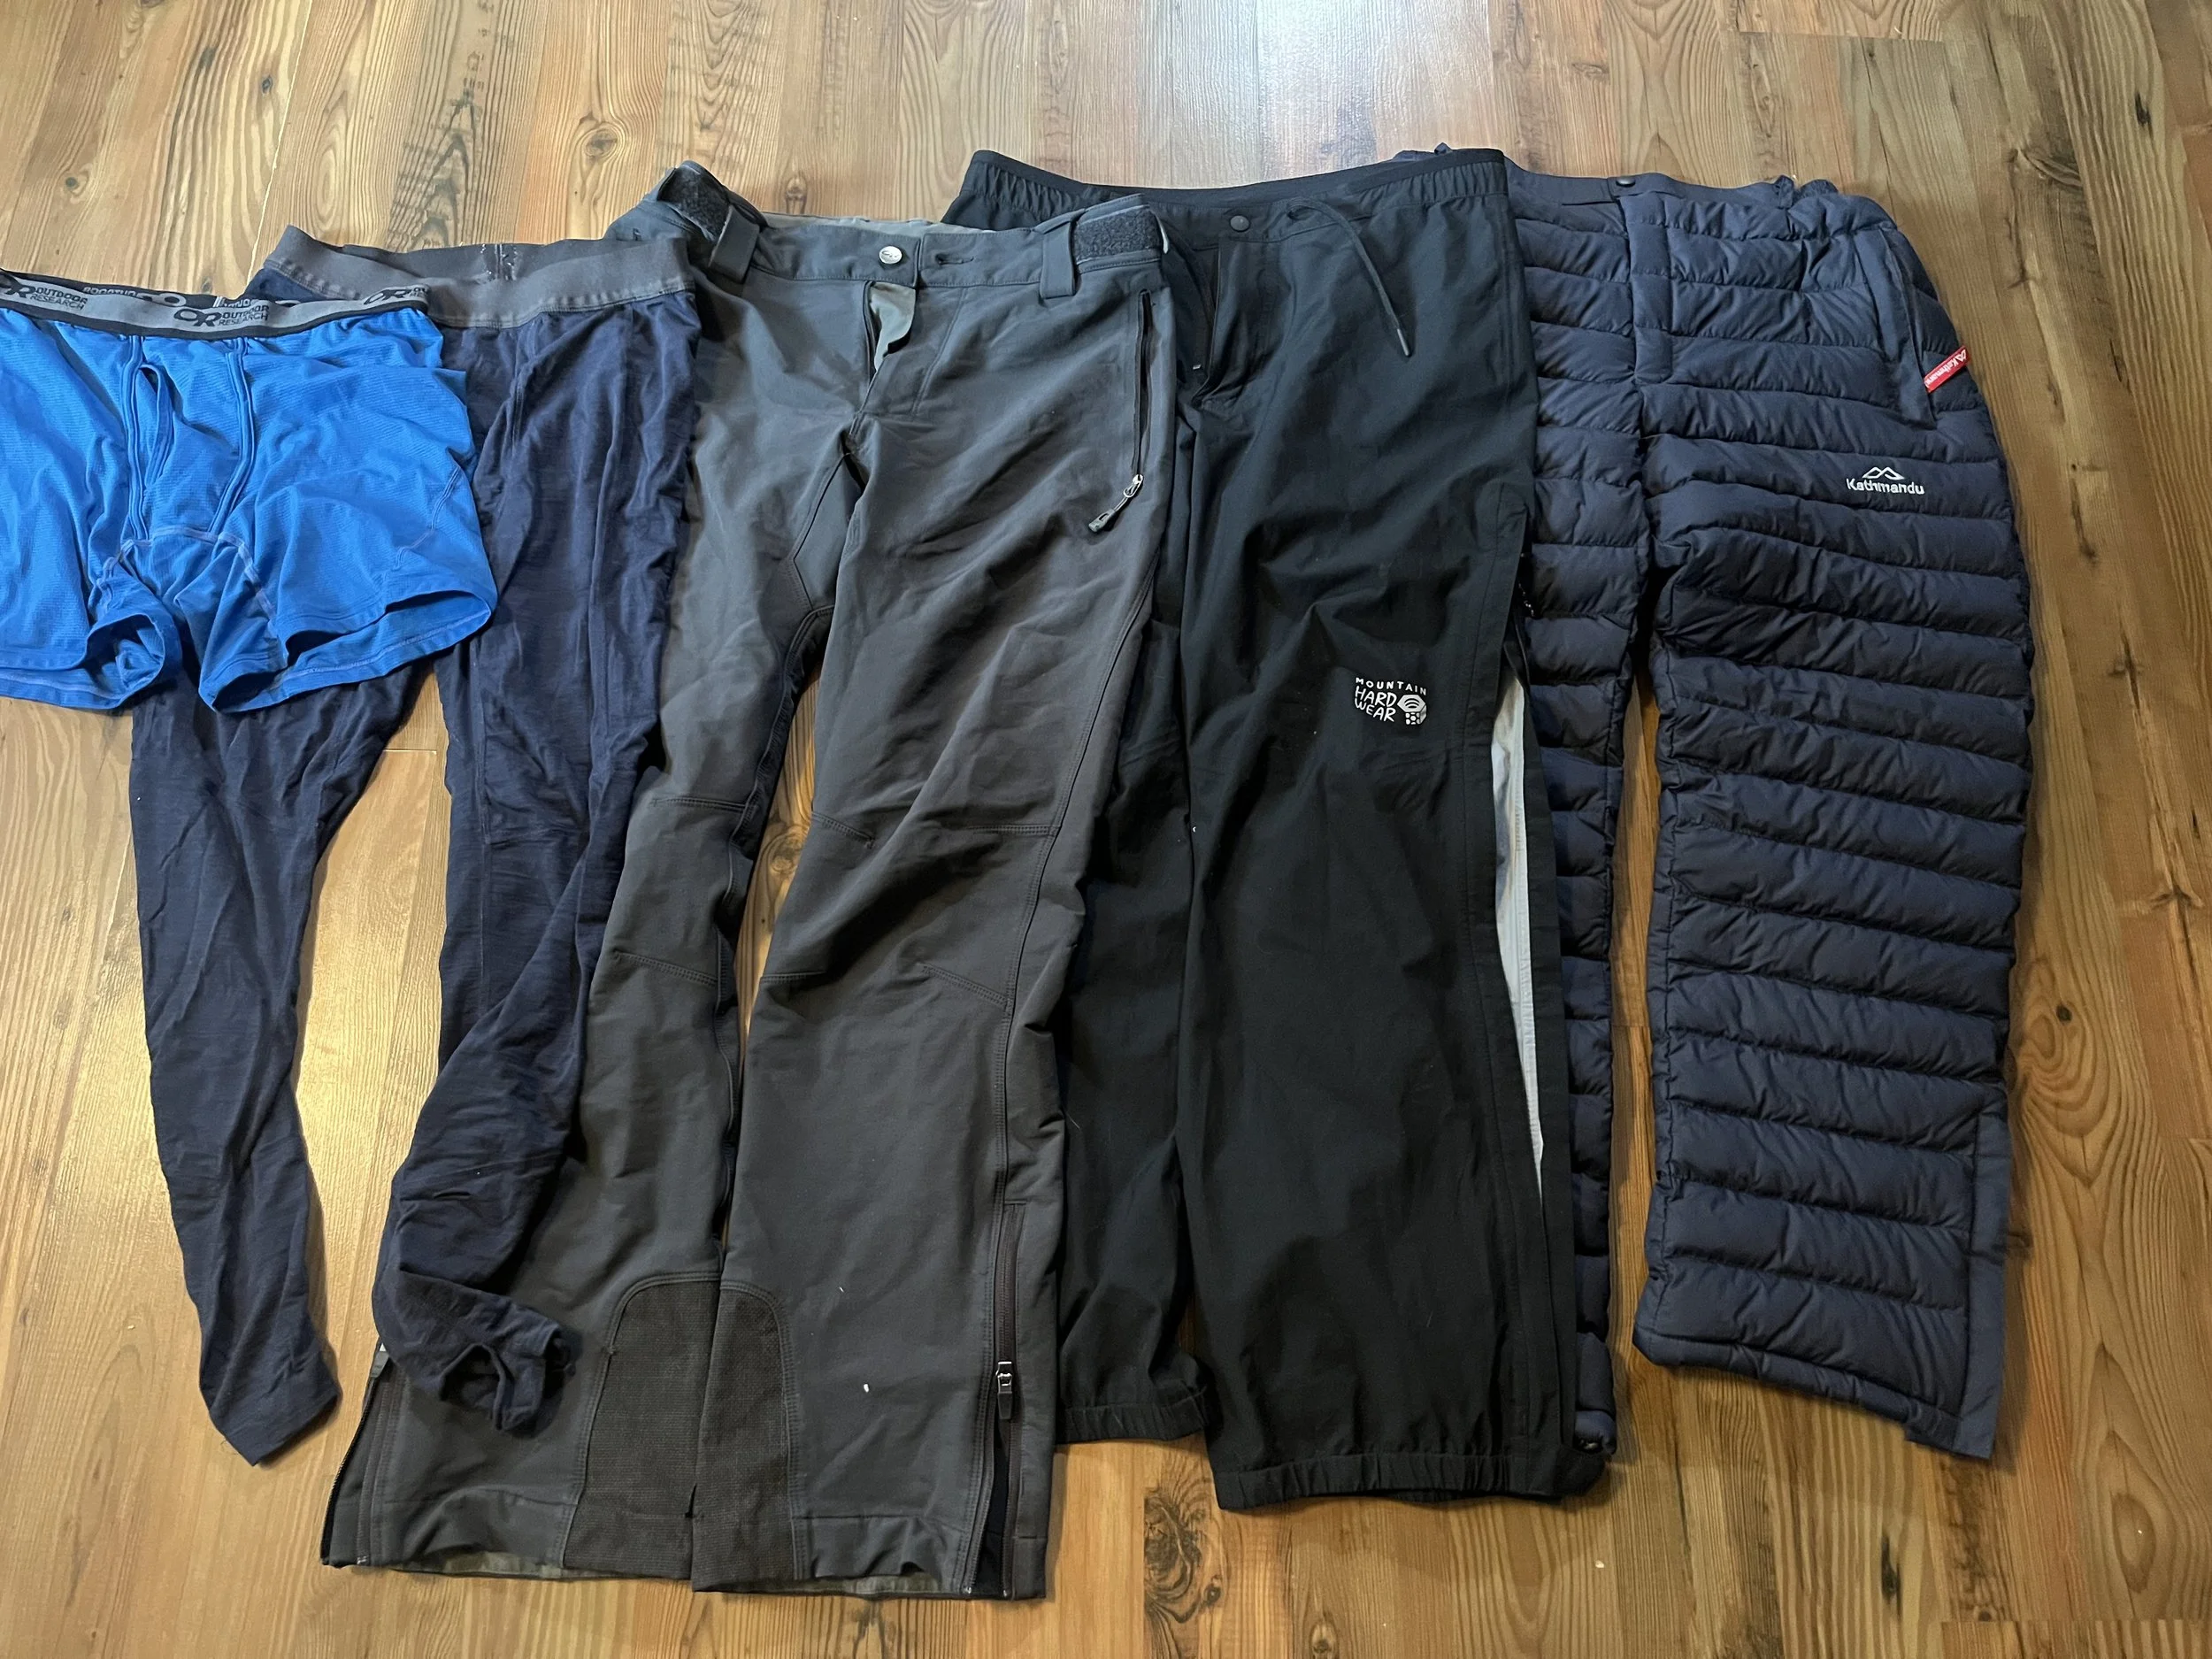
Underwear: Don’t do cotton! Just like other base layers go with synthetic or wool!
Long John’s: Having extra warmth on your lower body can make you feel warmer overall, especially when you’re participating in an activity that doesn’t involve moving to much. If I’m on a multipitch ice climb I almost always have my long john’s, they help me feel a lot warmer when I’m sitting at the belay!
Softshell Pants: These are the pants I wear from the time I leave the car to the time I get back, they breath well enough when you’re moving but have some insulation so you don’t get instantly cold when you stop.
Hard Shell Pants: Along the same lines as the waterproof jacket, pairing the coat up with waterproof pants turns your body into a fortress of dryness against thundering rain. During the winter I choose heavier tougher rain pants, or if I’m going out in torrential rain. The rest of the year I roll with a lighter pair that spends most of the time in the pack. Make sure you have pant with full side zippers so you don’t have to take off your boots or crampons to put them on or take them off.
Insulation Pants: Good pants to have when you’re at camp at the end of a long day, most of the time I’ll roll with down pants for the packability, but sometimes I’ve brought out synthetic pants if I was moving in them throughout the day. If you pair these with your big parka you can walk around camp with the comfort of your sleeping bag! Again, make sure you have a full side zip so you can put them on and take them off with boots and crampons.
From left to right: Synthetic underwear (Outdoor Research Echo boxers), Long John’s (Mountain Hardwear mountain stretch tight), softshell pants (OR cirque pants), rain pants (MH stretch ozonic pants), down pants (Kathmandu pants- hard to get in America just get the MH Compressor pants)
Feet: The feet can often times be the coldest part of the body, I personally have had many struggles over the years keeping my feet warm. The best thing you can do for them is have a good pair of high-quality mountaineering boots that fit your feet well, and to pair those boots with high quality socks made for activity.
Socks: Many folks believe that if they get a thicker sock they can increase the warmth of their whole foot system, in reality that often times will cause a counter effect and make their foot colder over all. If you plan on wearing larger socks in your boots bring them to were you’re renting them or buying them and try on the boots with the socks you plan to climb in.
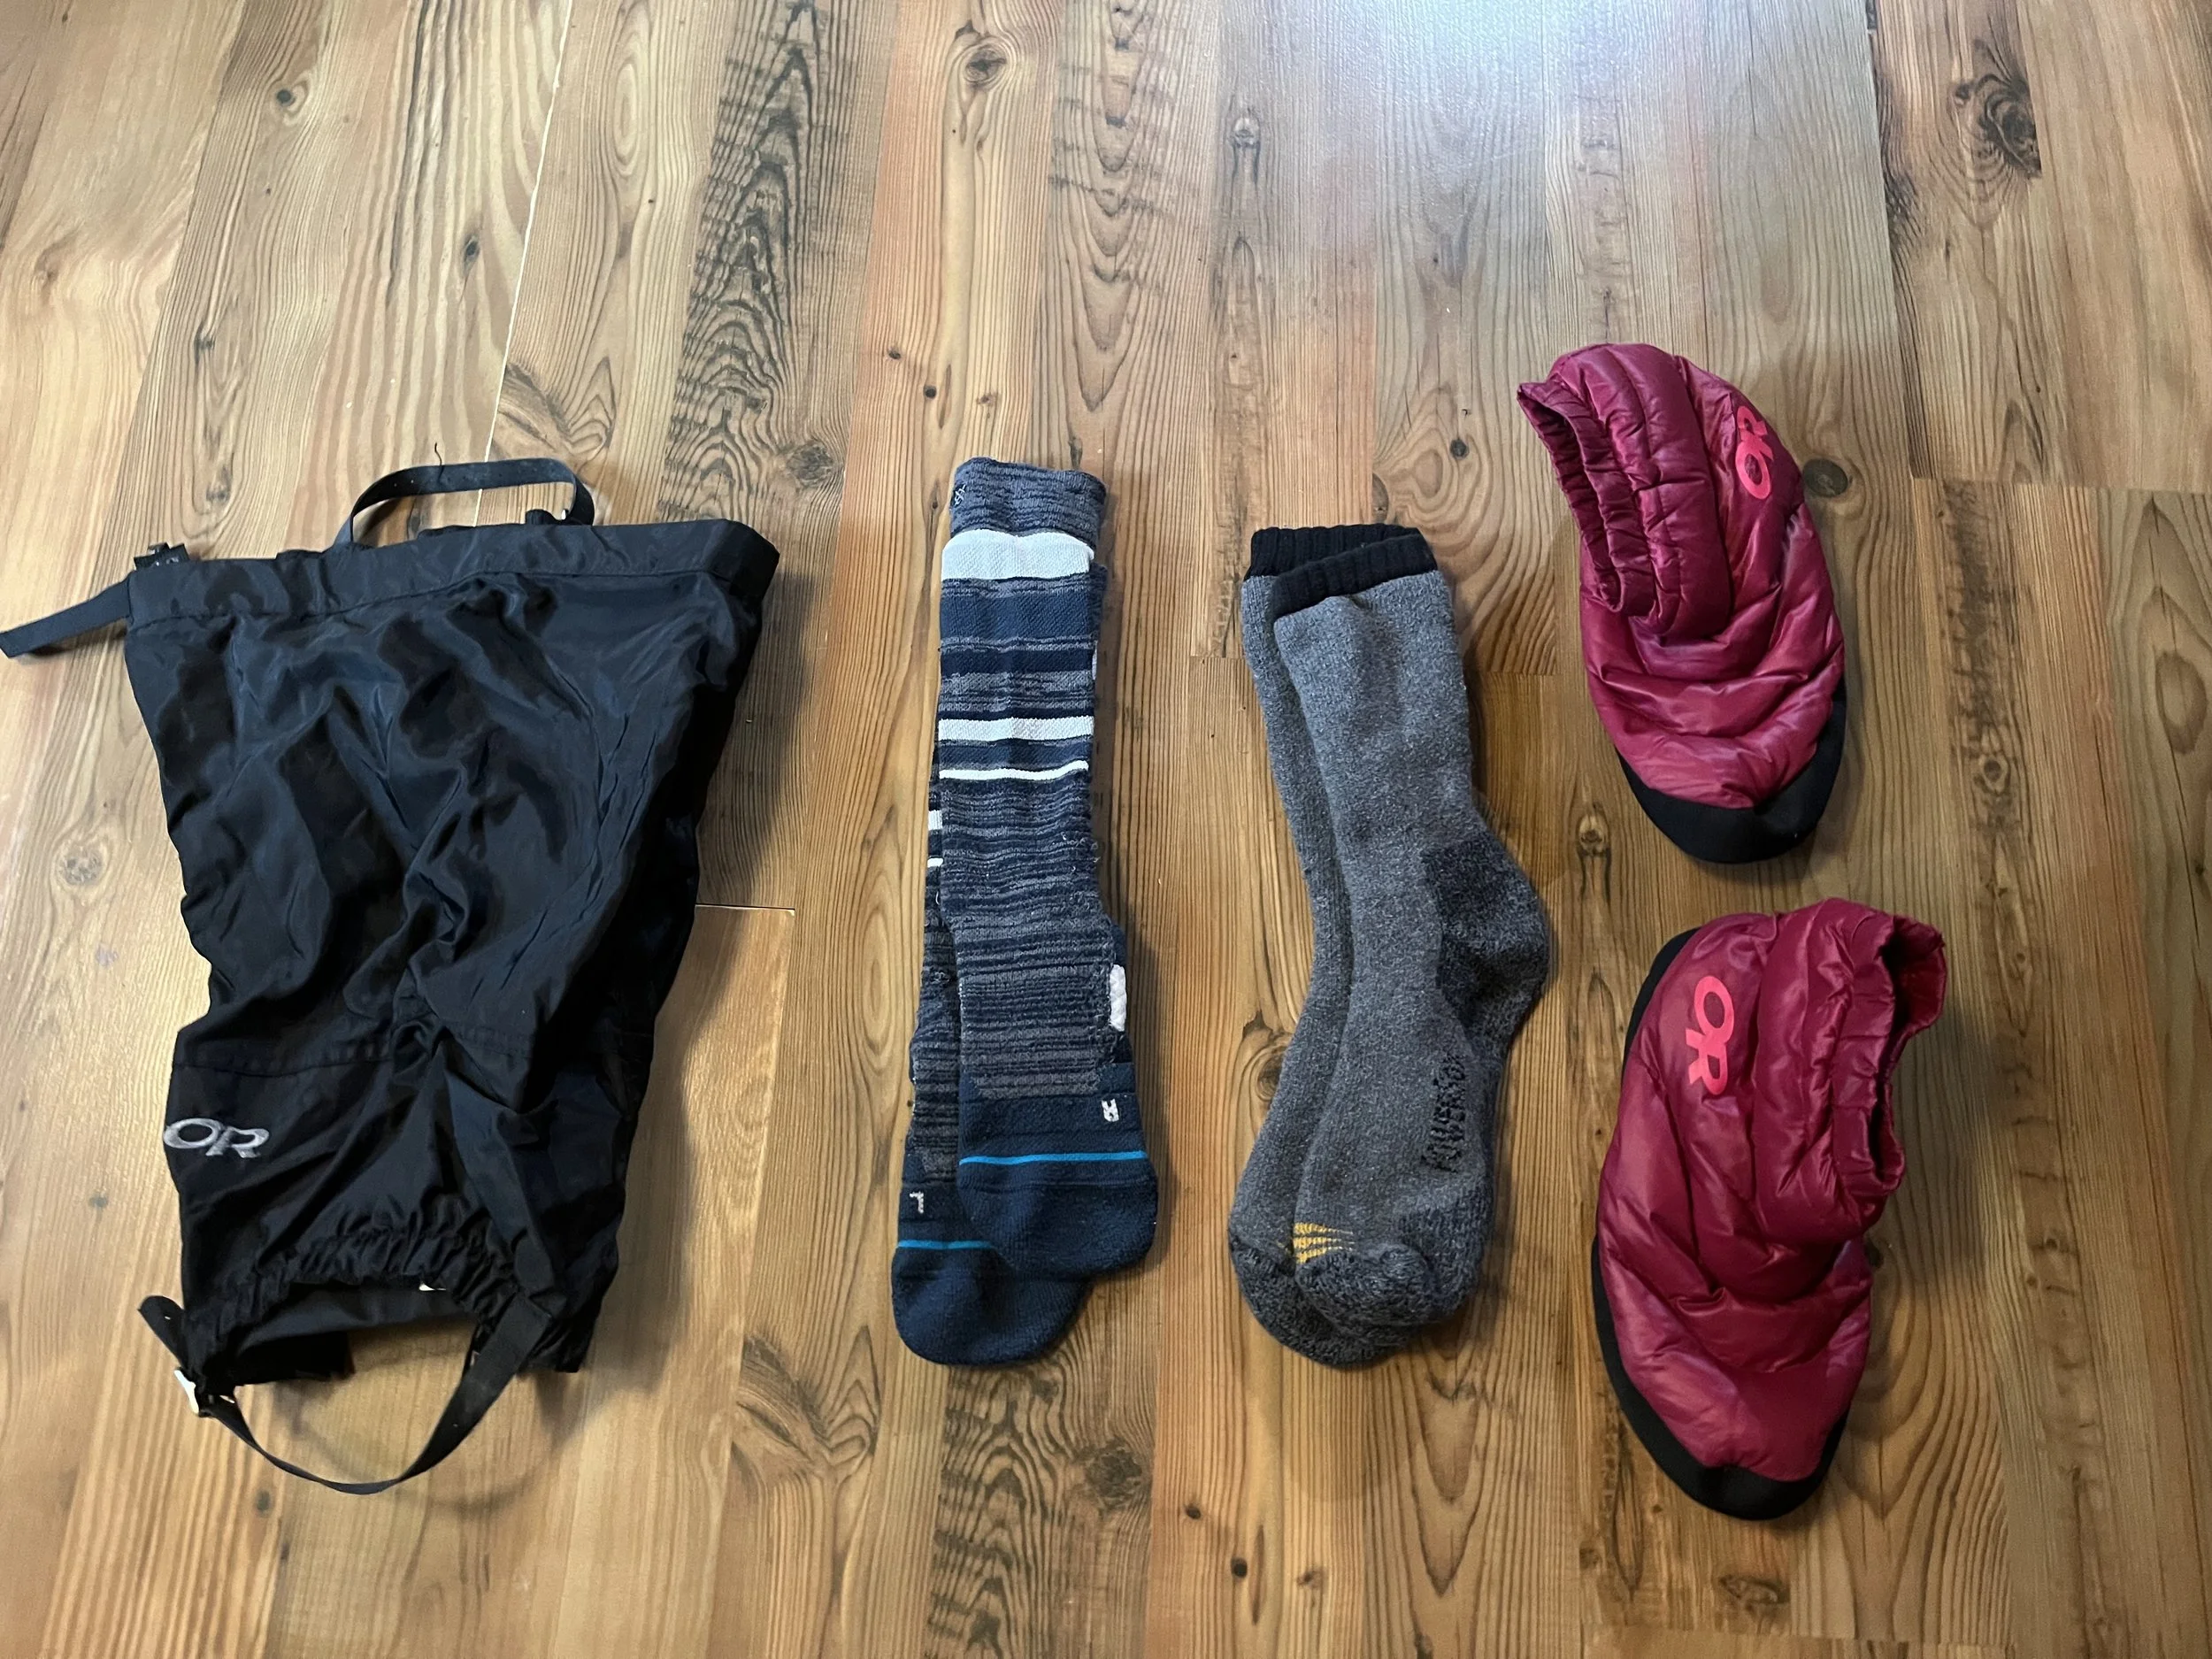
Thin socks: Though counter- intuitive, thin socks will often keep your feet warmer because there is more room in your boot for blood to flow throughout your foot. If you try to cram a bulky sock into your form fitted boot it could cause more constriction to the blood vessels in your foot and thus cause cold toes. I personally like using ski socks with my heavier mountaineering boots and Darn tough quarter cushion socks in my summer mountain boots for this exact reason.
Thick socks: Thick socks still have their place in the winter mountains, mainly as a sleeping aid, I may choose to keep a pair of thick socks in my sleeping bag to change into at night to help keep my feet warm while I dry out the socks that I’ve been wearing all day.
Gators: I understand that double boots cost quite a bit of money so you could add a little bit of extra insulation to your single boots with the help of gators, a good quality pair will probably set you back about fifty dollars and they can add quite a bit of warm to your boot. They are also required for deep snow conditions to keep snow out of your boots.
Down Booties: Many people like to bring a pair of down booties to walk around camp with, it helps to get your feet out of those mountain boots at the end of the day, and if temps get really cold you can always sleep with them in your bag!
Left to right: OR crocodile gators, Stance ski socks, Smartwool heavyweight hiking socks, OR tundra trax booties
Boots: This article isn’t about mountain footwear, (that’s a completely separate topic) but since boots are technically part of a foot layering system it is good to bring up a couple of points.
Single boots: Good for day trips, but not the best for overnight winter mountaineering trips. For some folks they will be able to keep their feet warm and dry in a pair of single boots but most people will want something a little more robust for a multiday mountaineering trip.
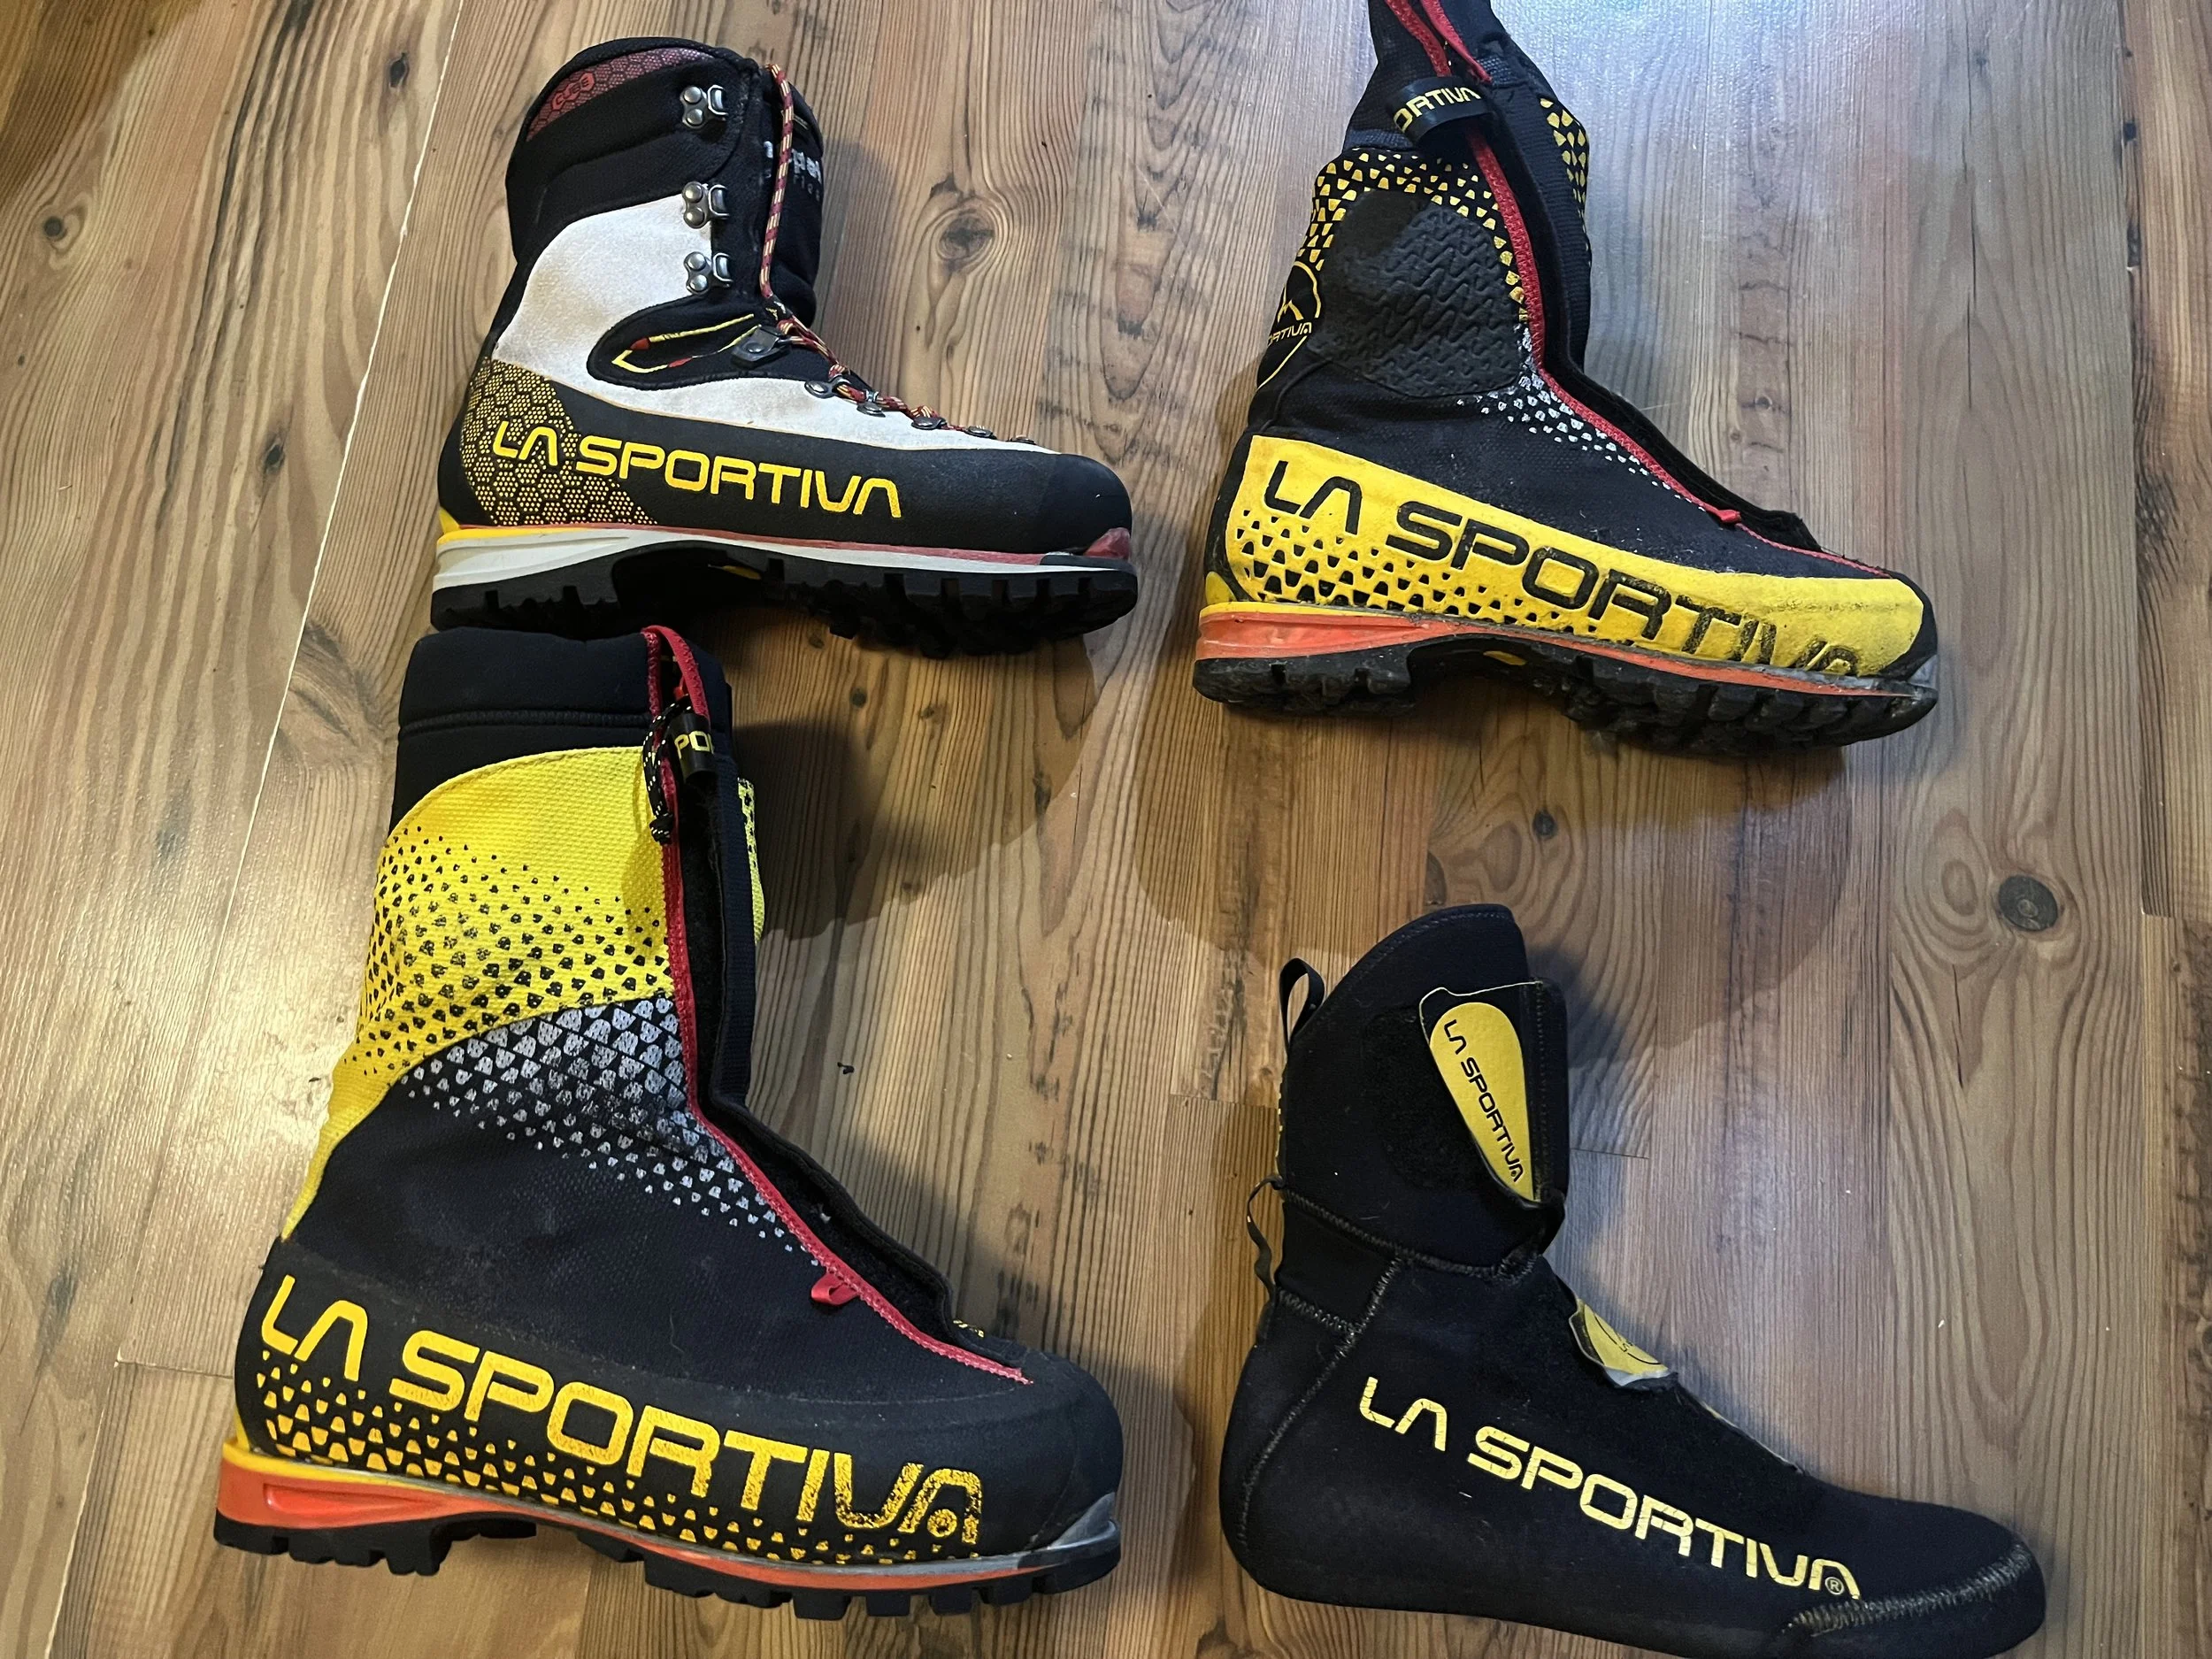
Double boots: The recommended footwear for winter mountaineering overnight trip, double boots include an inner boot and outer boot, which adds quite a bit more warmth to your foot system. In addition, after a long day you can take the inner boot out and sleep with it in your sleeping bag to dry it out and keep it warm. I like the La Sportiva G2SM or the Scarpa Phantom 6000.
A selection of mountain boots top left to right: La Sportiva Nepal Cube (single boot), G5 (single boot with gator); bottom left: La Sportiva G2 SM (double boot), G2 SM liner (fits inside the outer boot)
Feet and hand warmers: These can be a good thing to pack a pair of as a piece of emergency gear. On cold mountaineering trips I will also pack a pair of toe warmers for the summit climb, but bringing one pair of feet or hand warmers per day of a trip adds a lot of extra trash and hassle to your days in the mountains. If you like to use them to warm you up in your sleeping bag at night, there are other options like the Nalgene bottle- which is reusable and has dual purposes. Try to limit yourself to just a few of these per trip.
Conclusion: In the end the mountains in winter are a pretty miserable place, you may be stuck in your tent for days on end. I can remember a specific 6- day trip of mine that saw only 6 hours of sunlight total! However, you can stay warm and comfortable throughout your trip by insuring you have high quality equipment that can serve you throughout your stay. Needless to say, all this gear takes up more space in your backpack, so you’ll want to size that up also. In hardship we find ourselves and travel back to the way our ancestors walked the earth before, we find our connection with nature and its fury. Most of all we always walk away with a story for everyone back at home.
